I’m sure you are saddened by the horrible fires that are devastating our friends and the animals in Australia. It seems so helpless to be watching from afar. I created this cute little koala as a way to help fundraise for Adelaide Koala Rescue. They have an Instagram and Facebook page where you can follow along and see all the good they are doing. Do be warned some of the images are very hard to look at.
AKR provides a free, volunteer based rescue service to the Adelaide and Adelaide Hills area.
In December 2019, the Adelaide Hills bushfires created the need to establish an Emergency Triage Centre to cater for the influx of burnt, displaced and orphaned Koalas.
This is a very simple pattern made up of just 4 crocheted circles. It’s my Wise Guys pattern reimagined.
Can you see it? Same base, the eyes with a round of grey are the ears, and another eye in black is the nose!
I’m going to cheat and reuse the directions and in progress images.
Supplies Needed:
Grey, white, and black worsted weight yarn. Only a small amount of each.
Size G/4.0 crochet hook
2 safety eyes
Tapestry needle to weave in ends
Pattern: for AKR Koala
For the head: Using grey chain 4 and slip stitch into the first chain to make a circle.
Chain 3 and then 13 DC into circle. I crochet over the end at this point to avoid weaving it in. Slip stitch into the top of the chain 3 to join.
Chain 3 then 2 DC into each stitch. Join with slip stitch and break yarn. Weave on your ends.
Koala Body
Ears make 2: Start just like the head but with white. Chain 4 and join with a slip stitch.
Chain 2. 10 HDC into circle. Join with slip stitch and break yarn. Don’t worry about the ends.
Attach grey yarn. Chain 2 and make 2 HDC in each stitch. Join and break yarn.
Koala Ears
Nose: Do the first round of the ears but with black.
Koala Nose
Now for the only tricky bit, assembly!
First shape then attach the nose. To shape it I used the cast on yarn threaded in a tapestry needle. Very loosely make two stitches to connect the sides of the nose. Don’t pull tight, this is just shaping. Now from the top to the bottom, gently pulling to round out the ends. Shape lightly as desired and attach to the center of the head.
Place the ears behind the head how you like them and use the safety eyes to tack into place. Flip over,sew the ears down a bit more, and trim yarn ends. You could finish it with felt and make a pin or use as an applique.
I hope you enjoyed this pattern! Please be sure to check out my Facebook page. I usually share recipes but also crochet patterns as I come up with them.
I’m on a mission to find the perfect frosting for Wacky Cake the best ever chocolate cake
Unfortunately I over cooked this frosting and it was delicious but much to hard.
Completely my fault, I know you will have better results! Plus I want to share with you all the recipes I try from my recipecollection.
This recipe was in Grandma R’s recipe box. Check out the note that says “home ec”. I bet this recipe is from her highschool days!
Unfortunately it’s written in pencil so it’s a bit hard to see in pictures.
White Fudge Frosting Recipe:
White Fudge Frosting:
3 C sugar
1/8 tsp salt
1 C milk
2 Tbsp butter
1/2 tsp vanilla
1/2 tsp almond extract
Combine sugar, salt, and milk in saucepan. Bring quickly to boil, stirring only until sugar is dissolved. Boil, without stirring, until a small amount of mixture forms a very soft ball in cold water. (234 degrees). Remove from heat. Add butter and flavoring. Cook to lukewarm. Beat until right consistency. Place over hot water to keep soft while spreading.
This is less of a recipe and more of a basic idea of how to use this new smoked sausage.
Johnsonville Korean Sausage
I spotted this new Johnsonville sausage flavor when getting the smoked sausage I needed for Sausage and Rice Skillet.
This one skillet recipe is a combination of the Sausage and Rice Skillet and Green Pepper Steak recipes. Both are easy for busy nights. And simple to swap ingredients based on what you have on hand and diet needs.
Now if you are Korean you are going to want to stop reading! This is the least authentic Korean food. At least compared to what I have had.
The Korean BBQ Sausage doesn’t taste too different from the regular smoked sausage I usually buy.
Ingredients:
Johnsonville Korean BBQ Sausage cut up
1/2 onion diced
Green Pepper diced
Rice or riced cauliflower
Soy sauce
Minced garlic
Olive oil
Broth or water
Brown sausage and onion in olive oil in a large skillet. Prepare rice or riced cauliflower. If using cauliflower squeeze as much liquid out as possible it will taste so much better. Mix in rice. Add about a cup of broth or water and approximately 1/4 C of soy sauce. Let simmer with a lid for 5-10 minutes. Add green pepper and any other veggies and cook until done.
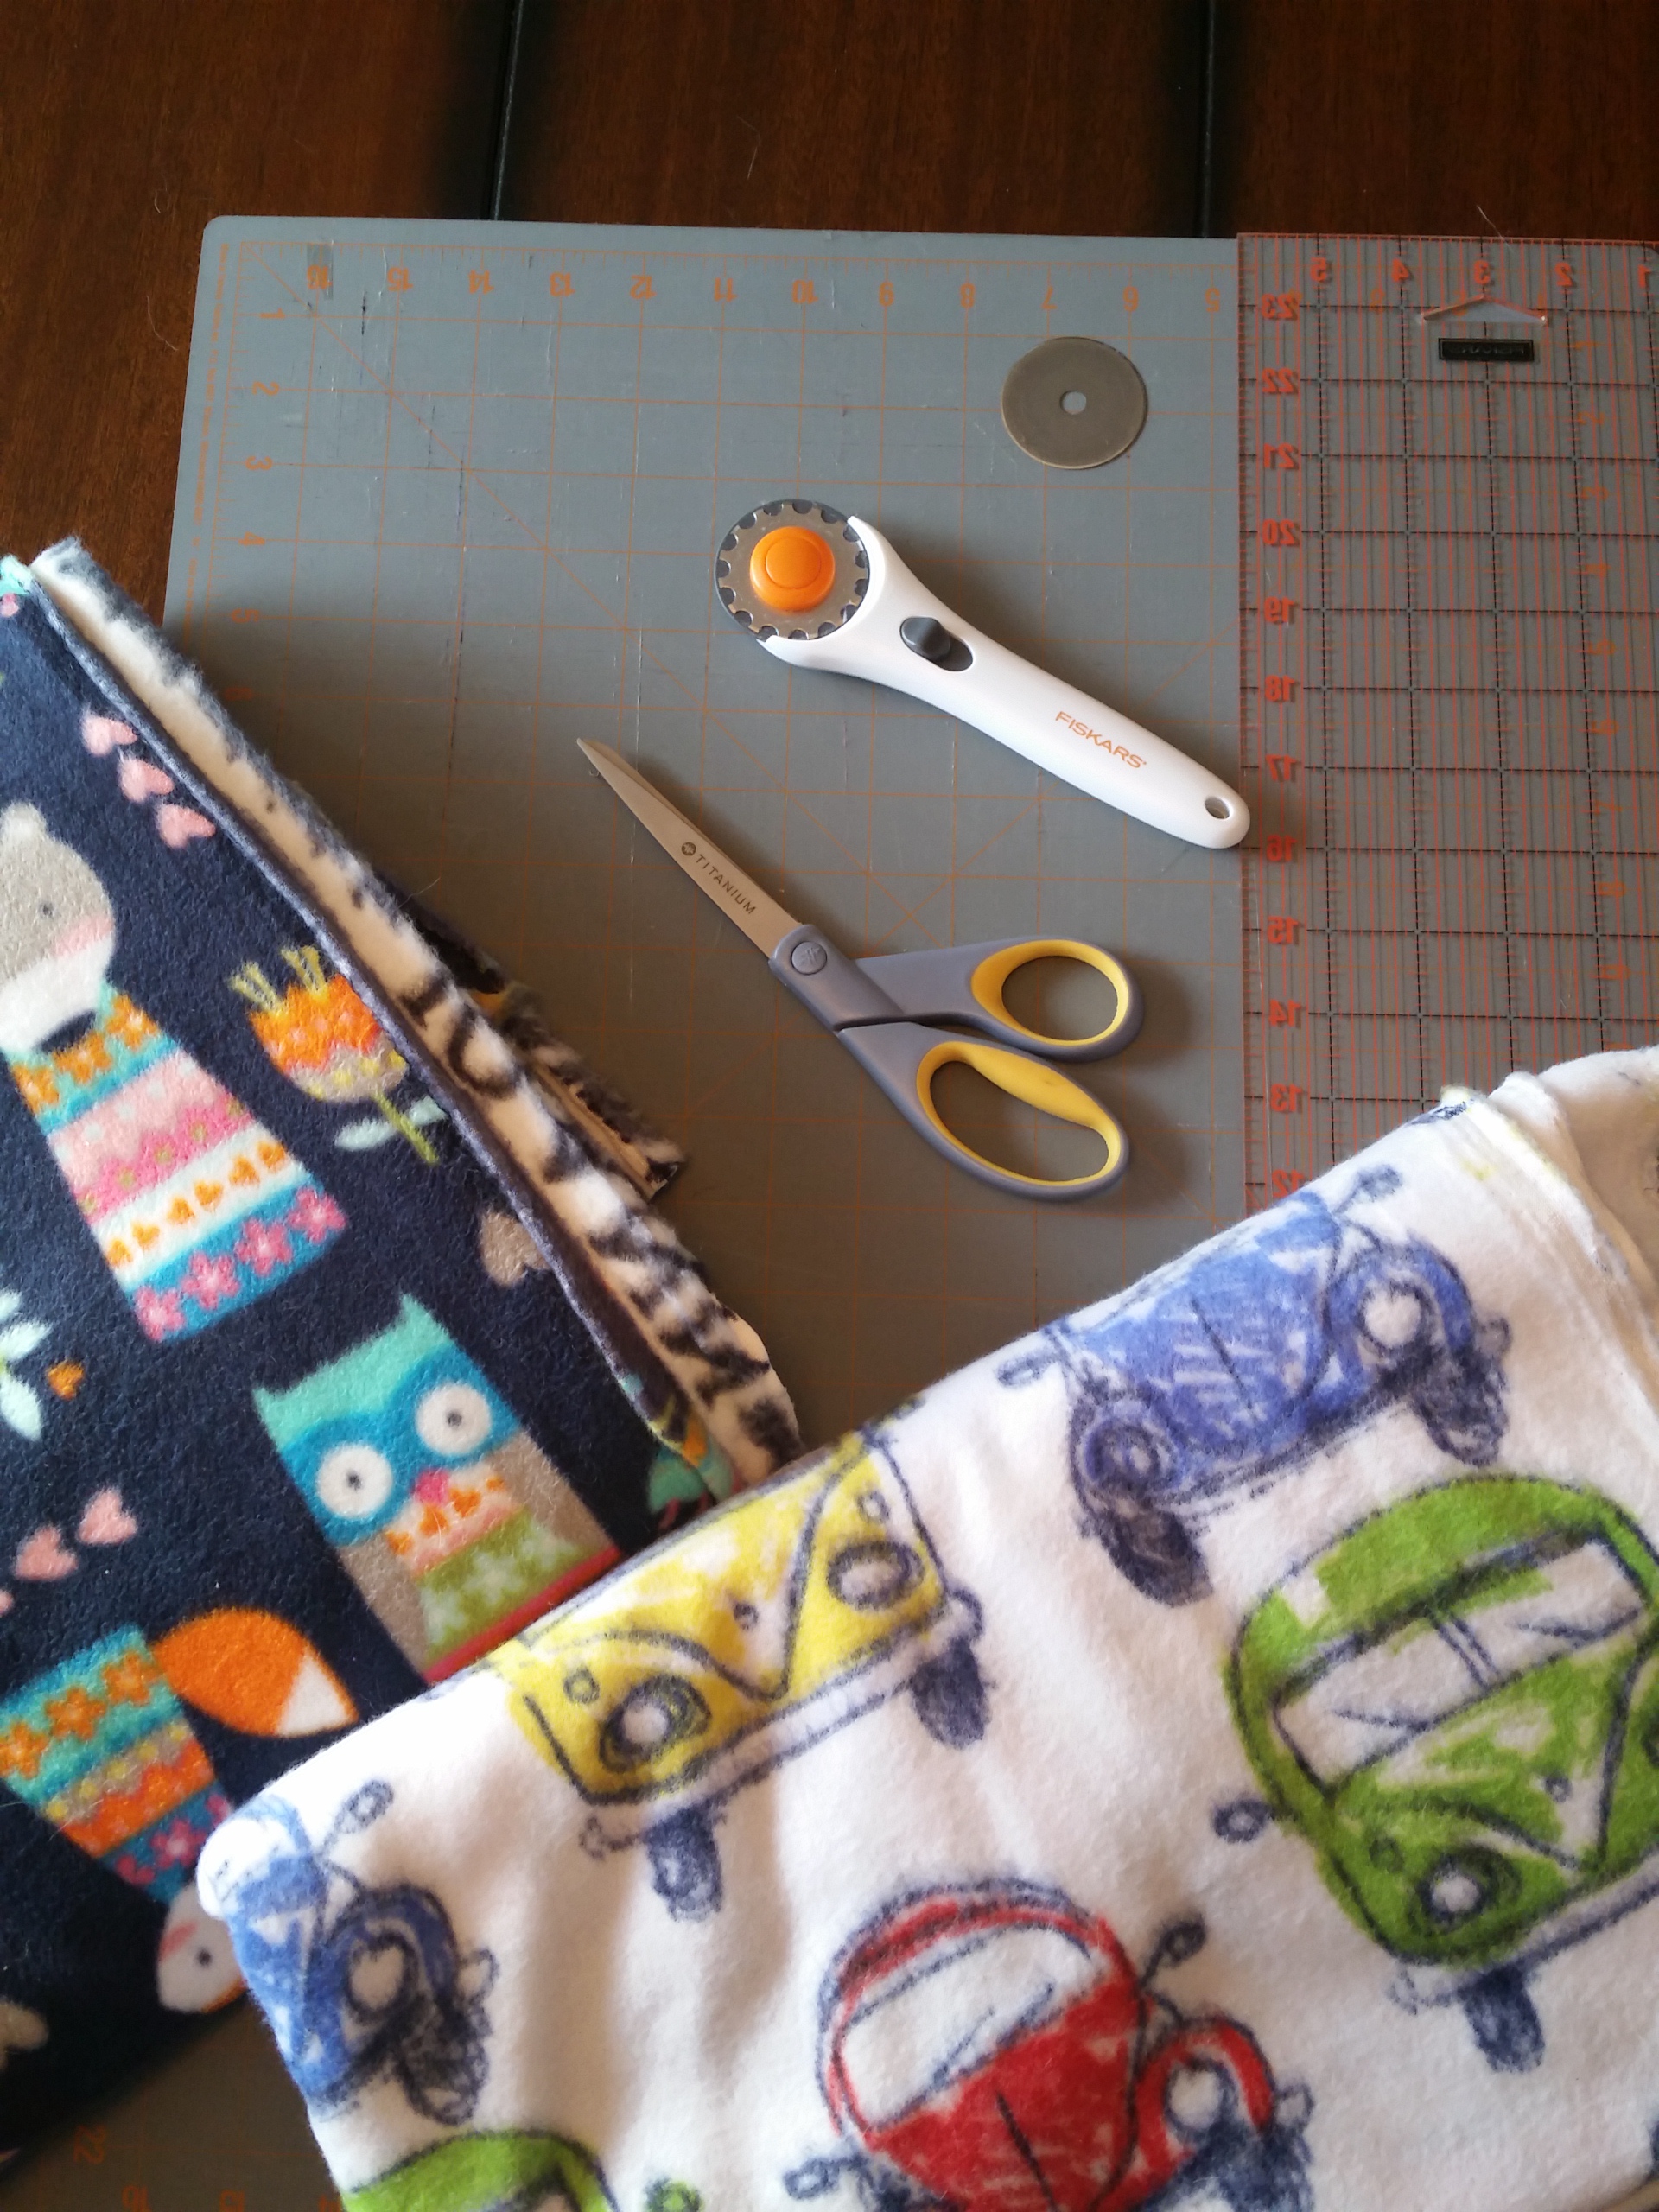
Here it is! A step by step tutorial to adding crochet edging to fleece! It is my new favorite thing to do and I am sure you will love it too. Best of all it is really pretty easy and opens a whole new world mixing fabrics in with your crochet. Join me on Instagram for crafty (and cat) pictures! These are the perfect baby shower gift. Make up several to have on hand. Make any size for quick gifts.
Before we start I want to warn you I am not a perfectionist. Things will not be perfect and I fudge mistakes an awful lot!
Step One: Gather Your Supplies
For this project you will need Fleece, scissors, a rotary cutter and a skip blade, a cutting mat, and a clear ruler. You could skip the ruler if you don’t have one and use a something else with a flat edge as a guide.
A note about fleece. I like to buy remnants. They are a piece of fleece less than 1.5 yards, kind of left overs at the craft store. The best part is that they are an extra 50% off the sale price! A super good bargain. I try to be sure the remnants I buy are at least .75 or a yard or more. You obviously can just buy fleece in whatever size you want.
This technique also works on flannel but the flannel isn’t quite as easy to work with. The holes had a bit of fray in them so it is more work to cram the hook through. I am guessing it would work with micro-fleece, lux fleece, or minky but am not sure.
This is my rotary cutter with a skip blade. A must for this project. I found mine with the other rotary cutters and scissors.
Step Two: Prepare your Fabric
This one is easy! Just cut the selvage off each end. I am saving the strips for a maybe someday project. Normal non craft hoarders would throw them out.
Then you need to cut your fabric to size. Since I am using remnants the sizes are sometimes odd. I just eyeball it and cut off what is needed to make a normal sized blanket. I am cutting mine in 5 inch increments because I am making 5 inch squares with the extra to someday make a patchwork type blanket. With crochet edging of course.
Step Three: Make the holes
Now it’s time for the fun part! Using the skip blade to make the holes you will crochet in. Don’t worry it’s not as scary as it sounds.
Put your fleece in a single layer out on the cutting mat. Line it up so you can start off with straight lines. It doesn’t have to be perfect! I don’t even trim off jagged edges because they will roll under when you crochet. Put your ruler about 2/3 of an inch in this gives enough fleece to roll under and make a neat edge. Approximately! Don’t stress here.
Line your cutter up and go for it! Press firmly and go slow.
This is what the holes look like. My mat isn’t very big so I have to pull the fabric towards me and then re do the ruler. This is the only time I match the holes up for cutting. Just put one of the blades in the last hole and continue on.
Corners. I debated and debated how to do the corners. As usual I picked the easiest way. Just go for it. I just line the fabric up and cut. Not worrying about lining up holes or any thing. It works out just fine.
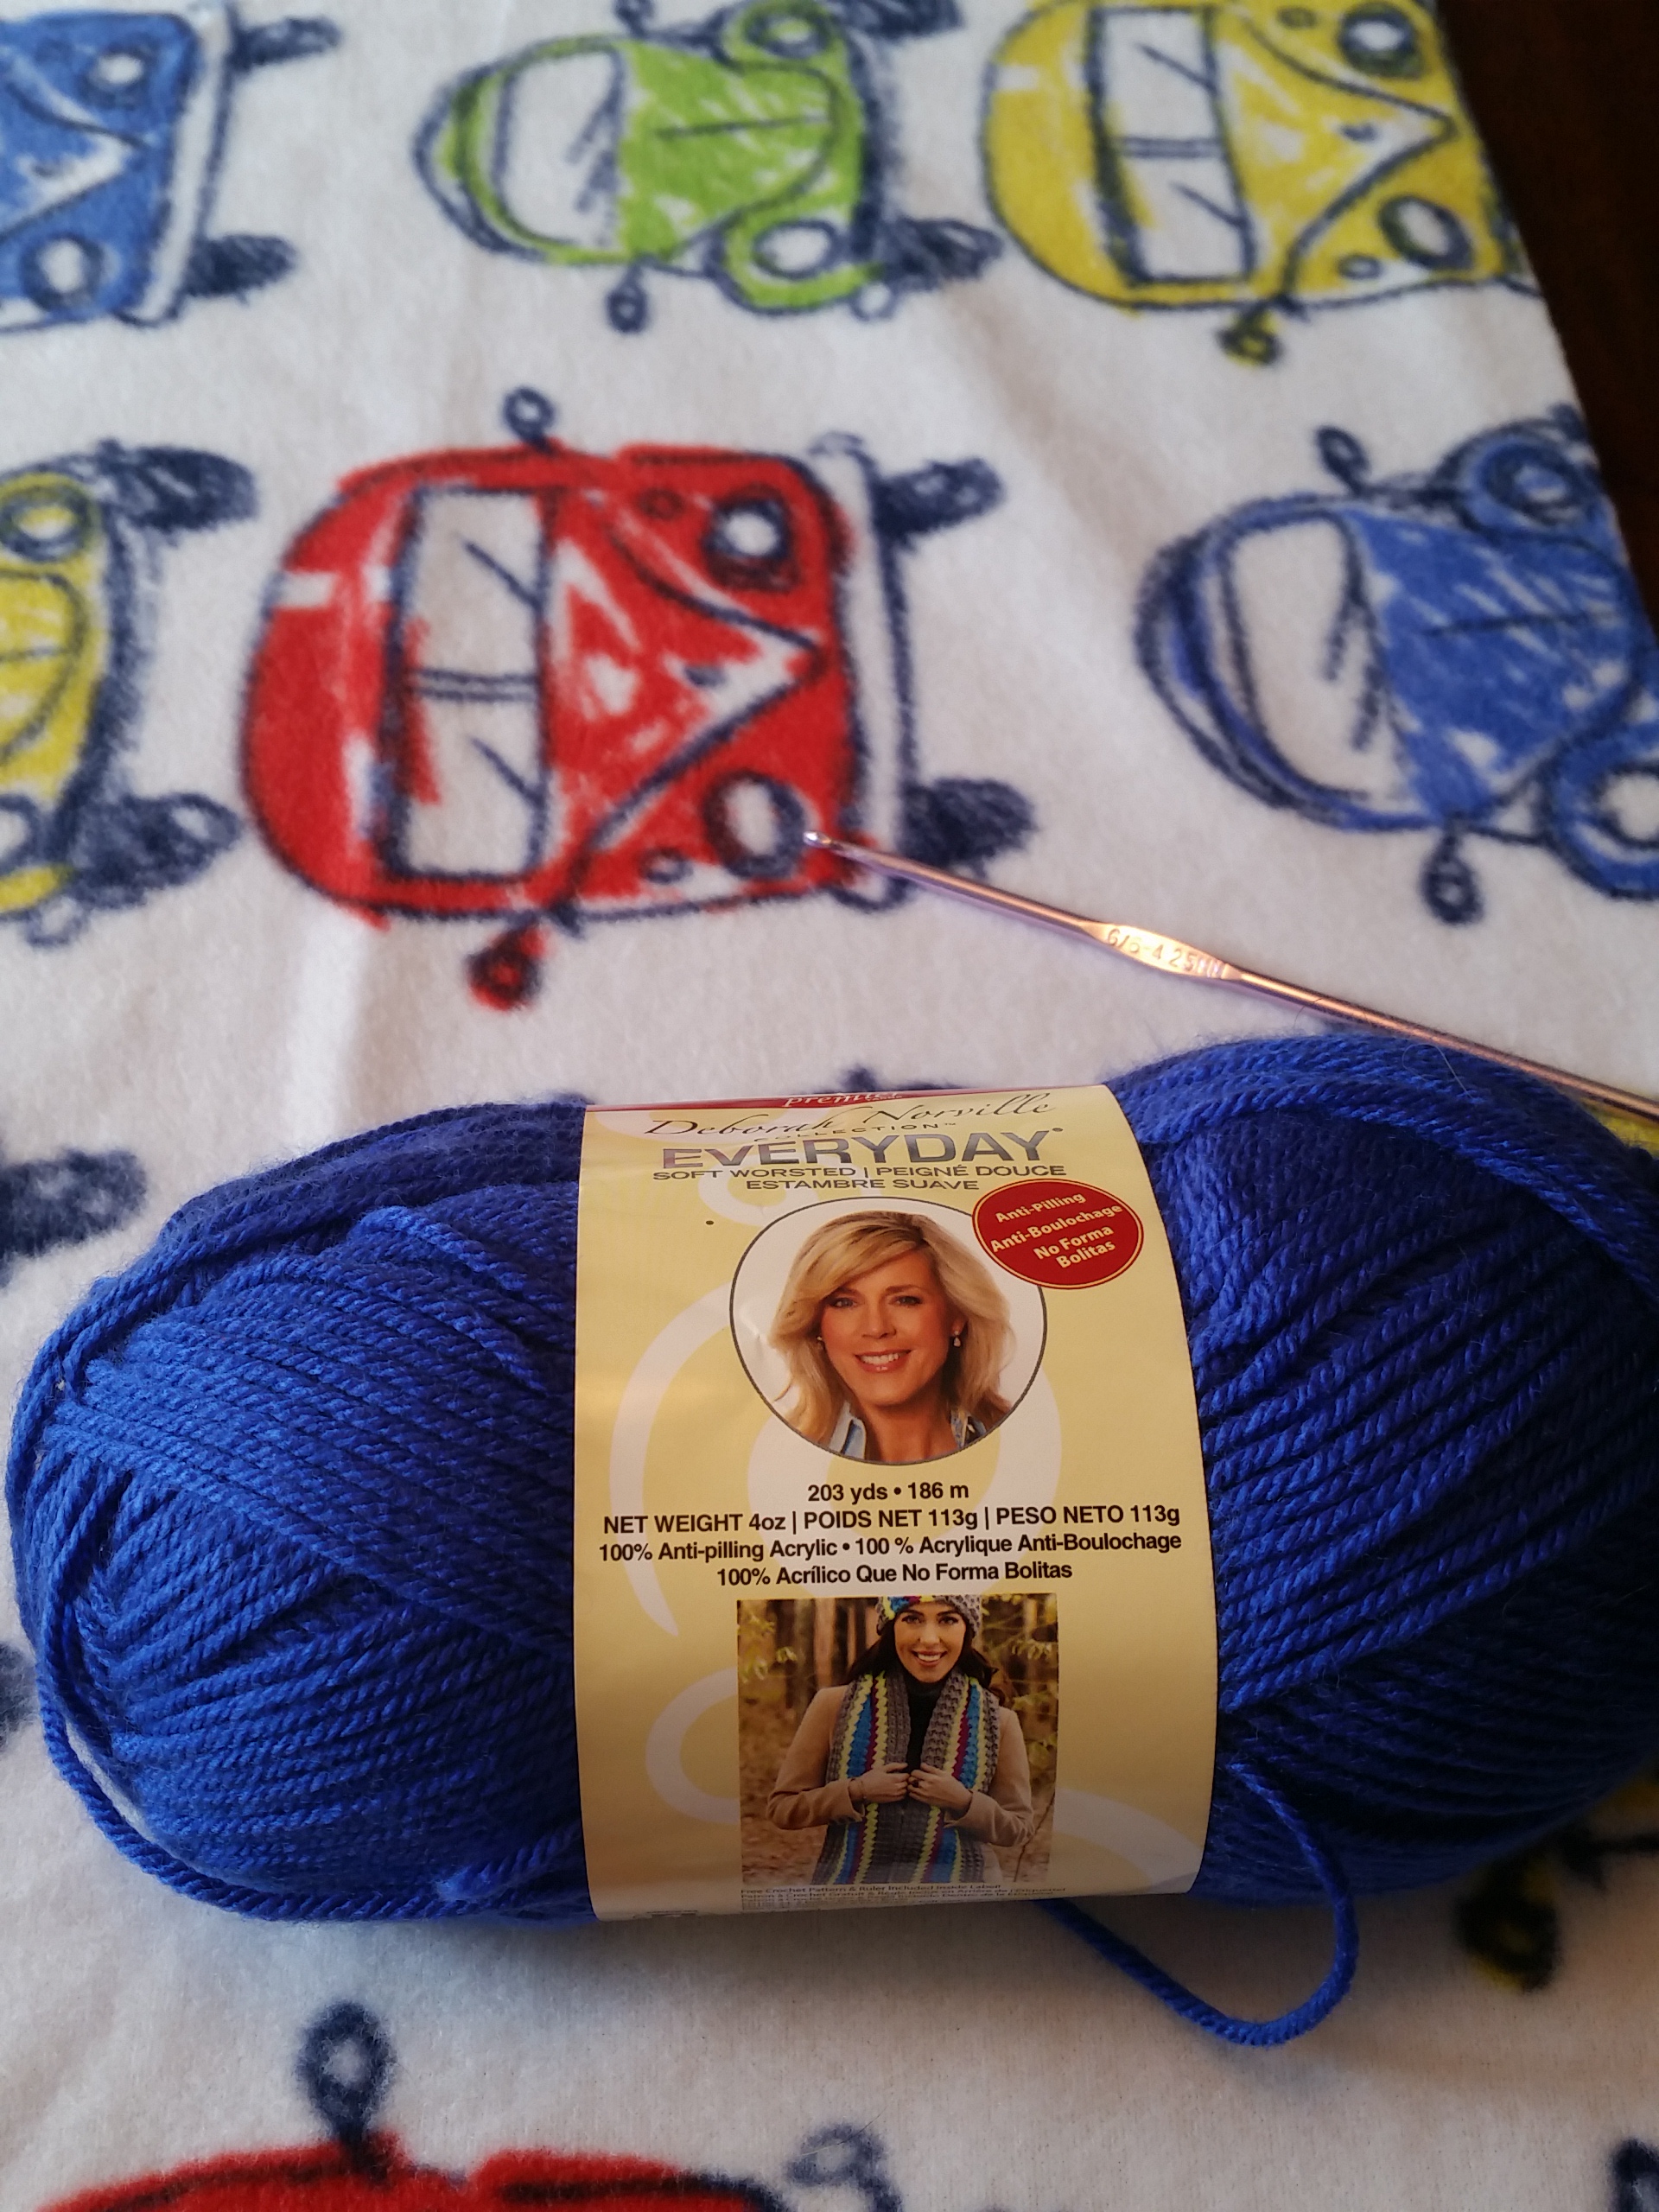
That wasn’t so hard was it? Now put away your cutting supplies and find your hook and yarn.
Part Two: Crochet Round 1
I am using some Deborah Norville worsted weight acrylic yarn. Any brand you prefer will work just fine. For me it was mostly about finding the color that matches best.
Size G crochet hook. This is the size I always use. Pretty much for everything. If you have a favorite for worsted weight use that instead. When my aunt taught me to crochet she told me to use this for everything so I do.
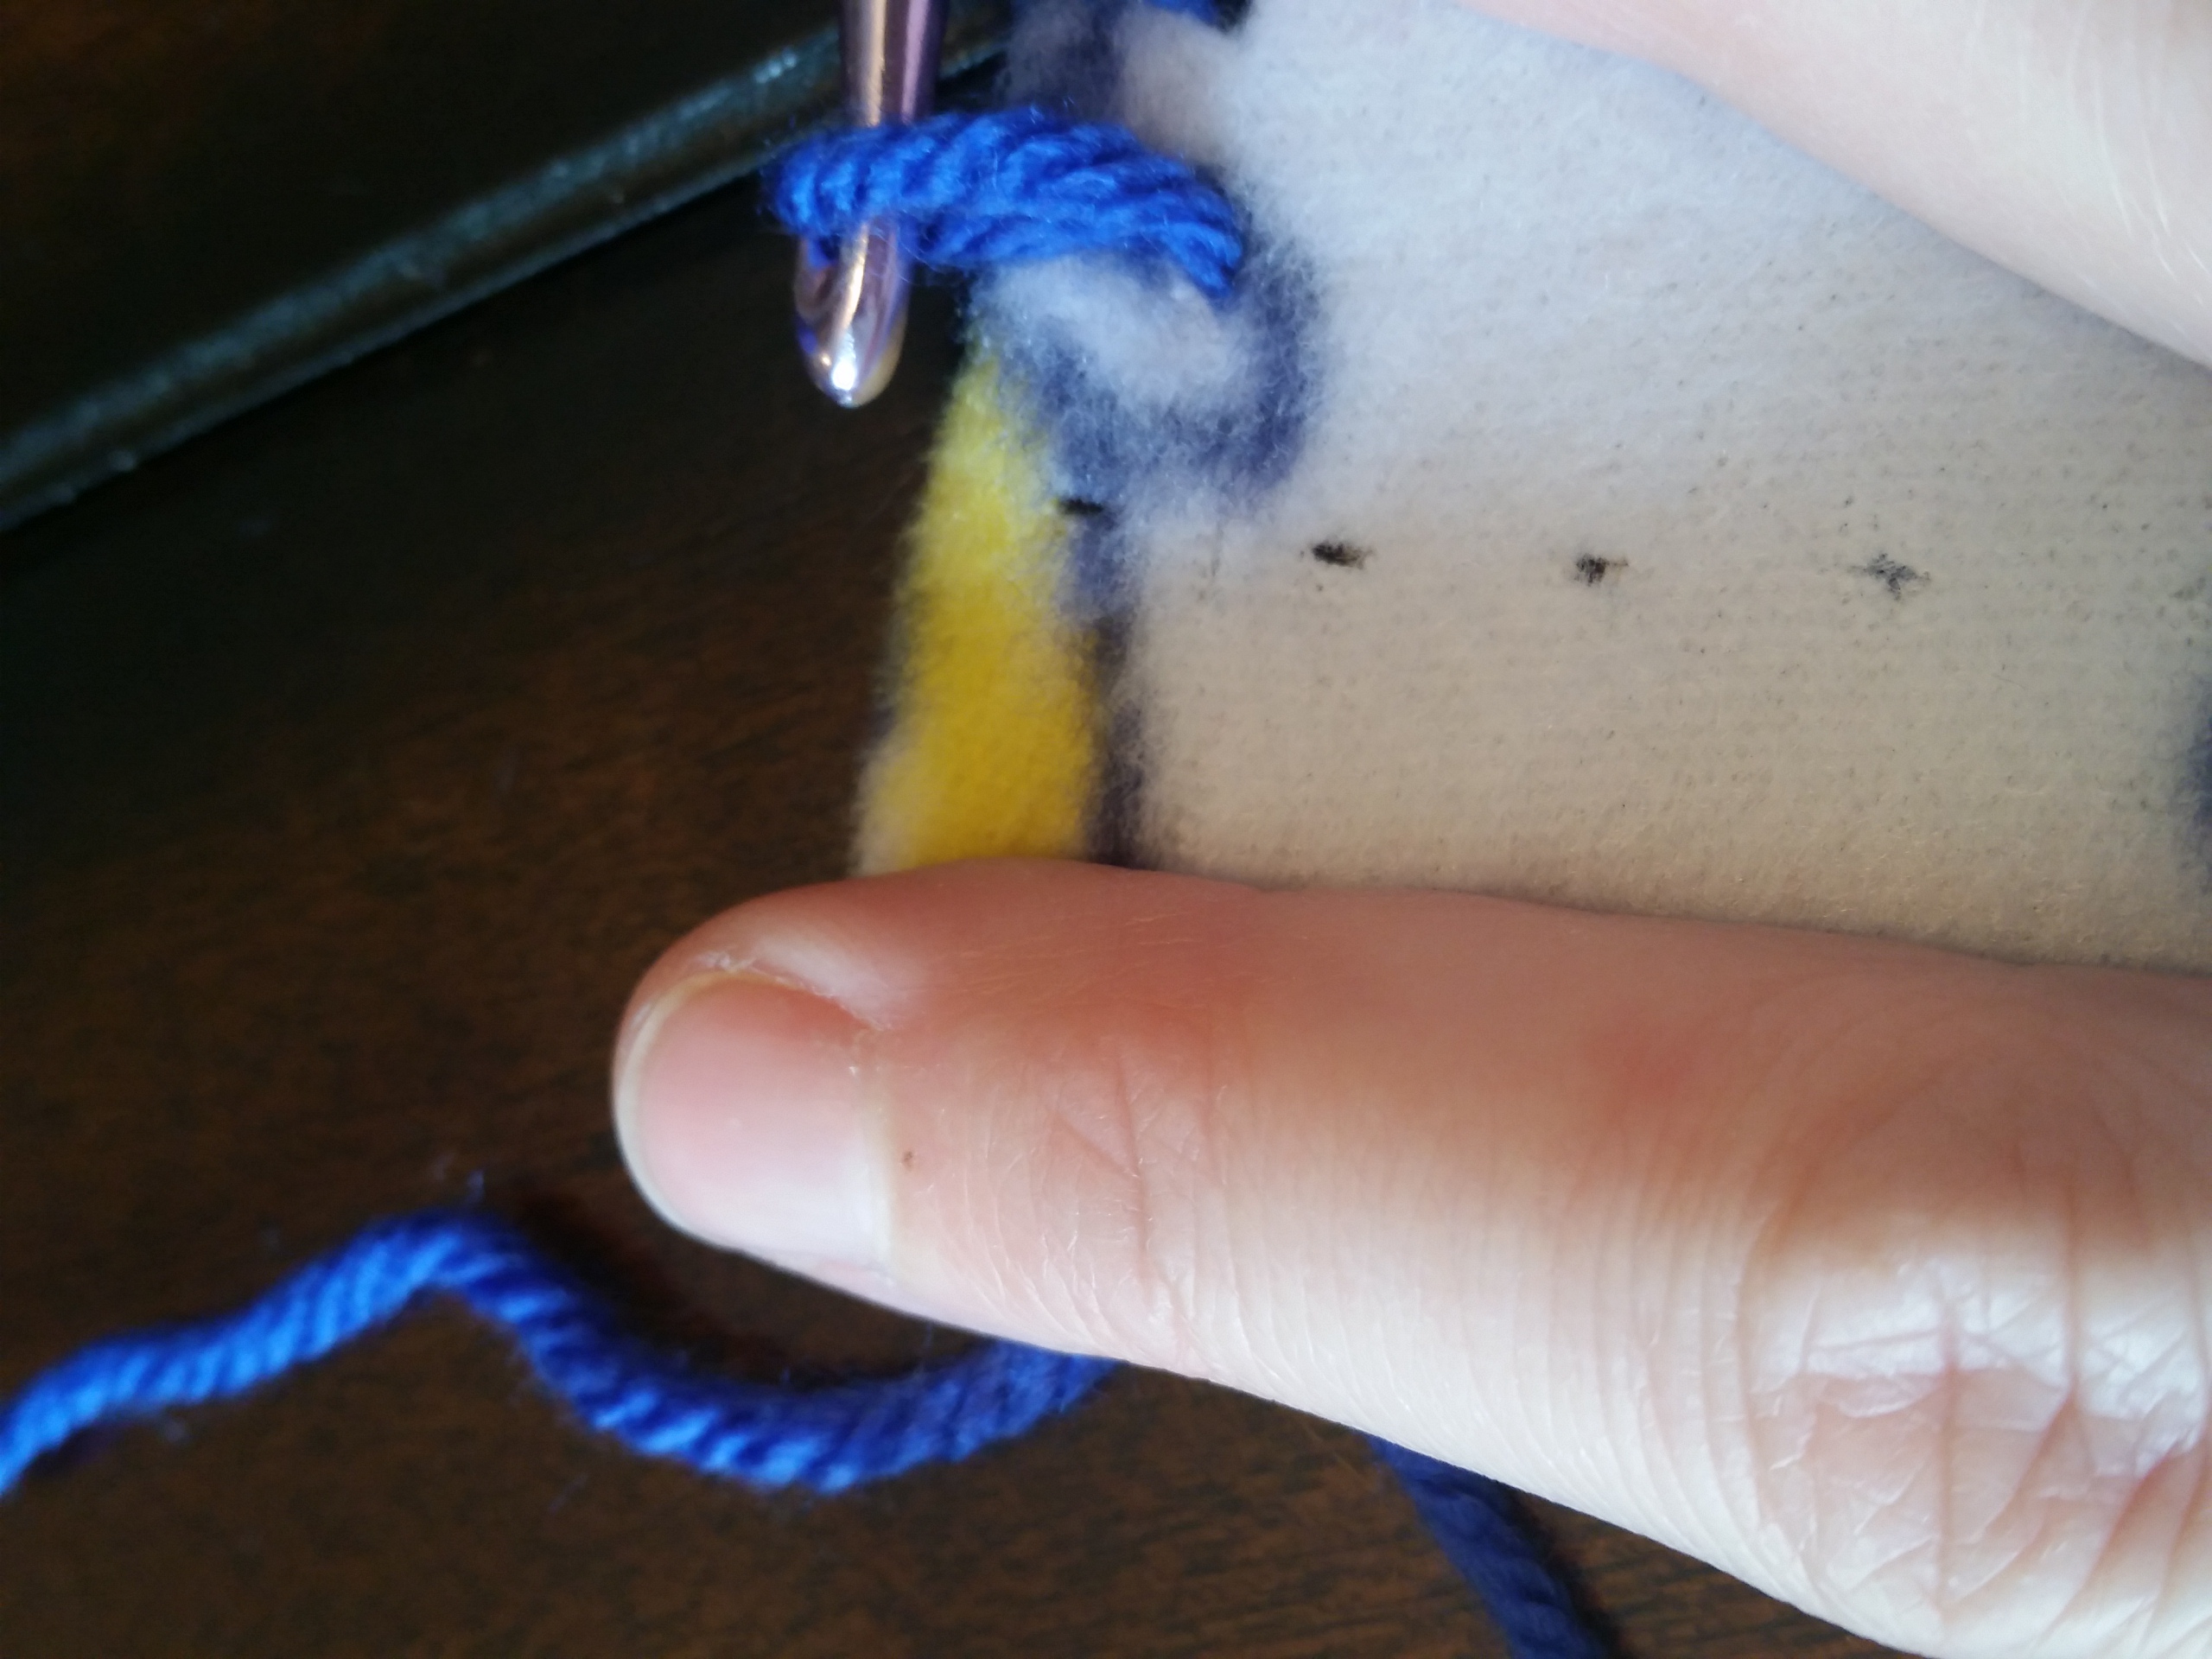
Holding the good side of the fabric towards you find a hole in the middle of an edge. Roll the fabric back so the edge is just above the hole. Poke your hook thru and pull a loop of yarn through. Chain one.
This is the back of the fabric after the first stitch. I slip the yarn end under the fold and work it in that way.
Now work a single crochet into each hole. Be sure to keep your stitches sort of loose so they don’t pull. Work until you get to a corner.
Work two stitches in the last one on that side. The one where I have my hook. Turn the fabric, tuck the corner down and work two in the next one. In this picture it would be the second one from the left.
The back looks a bit messy. After I am all done I use my tiny scissors to trim it up a bit and it isn’t noticeable.
Continue working a single crochet into each hole and working the corners as described. At the last stitch slip stitch into the first. If you are switching colors cut the yarn otherwise leave it be.
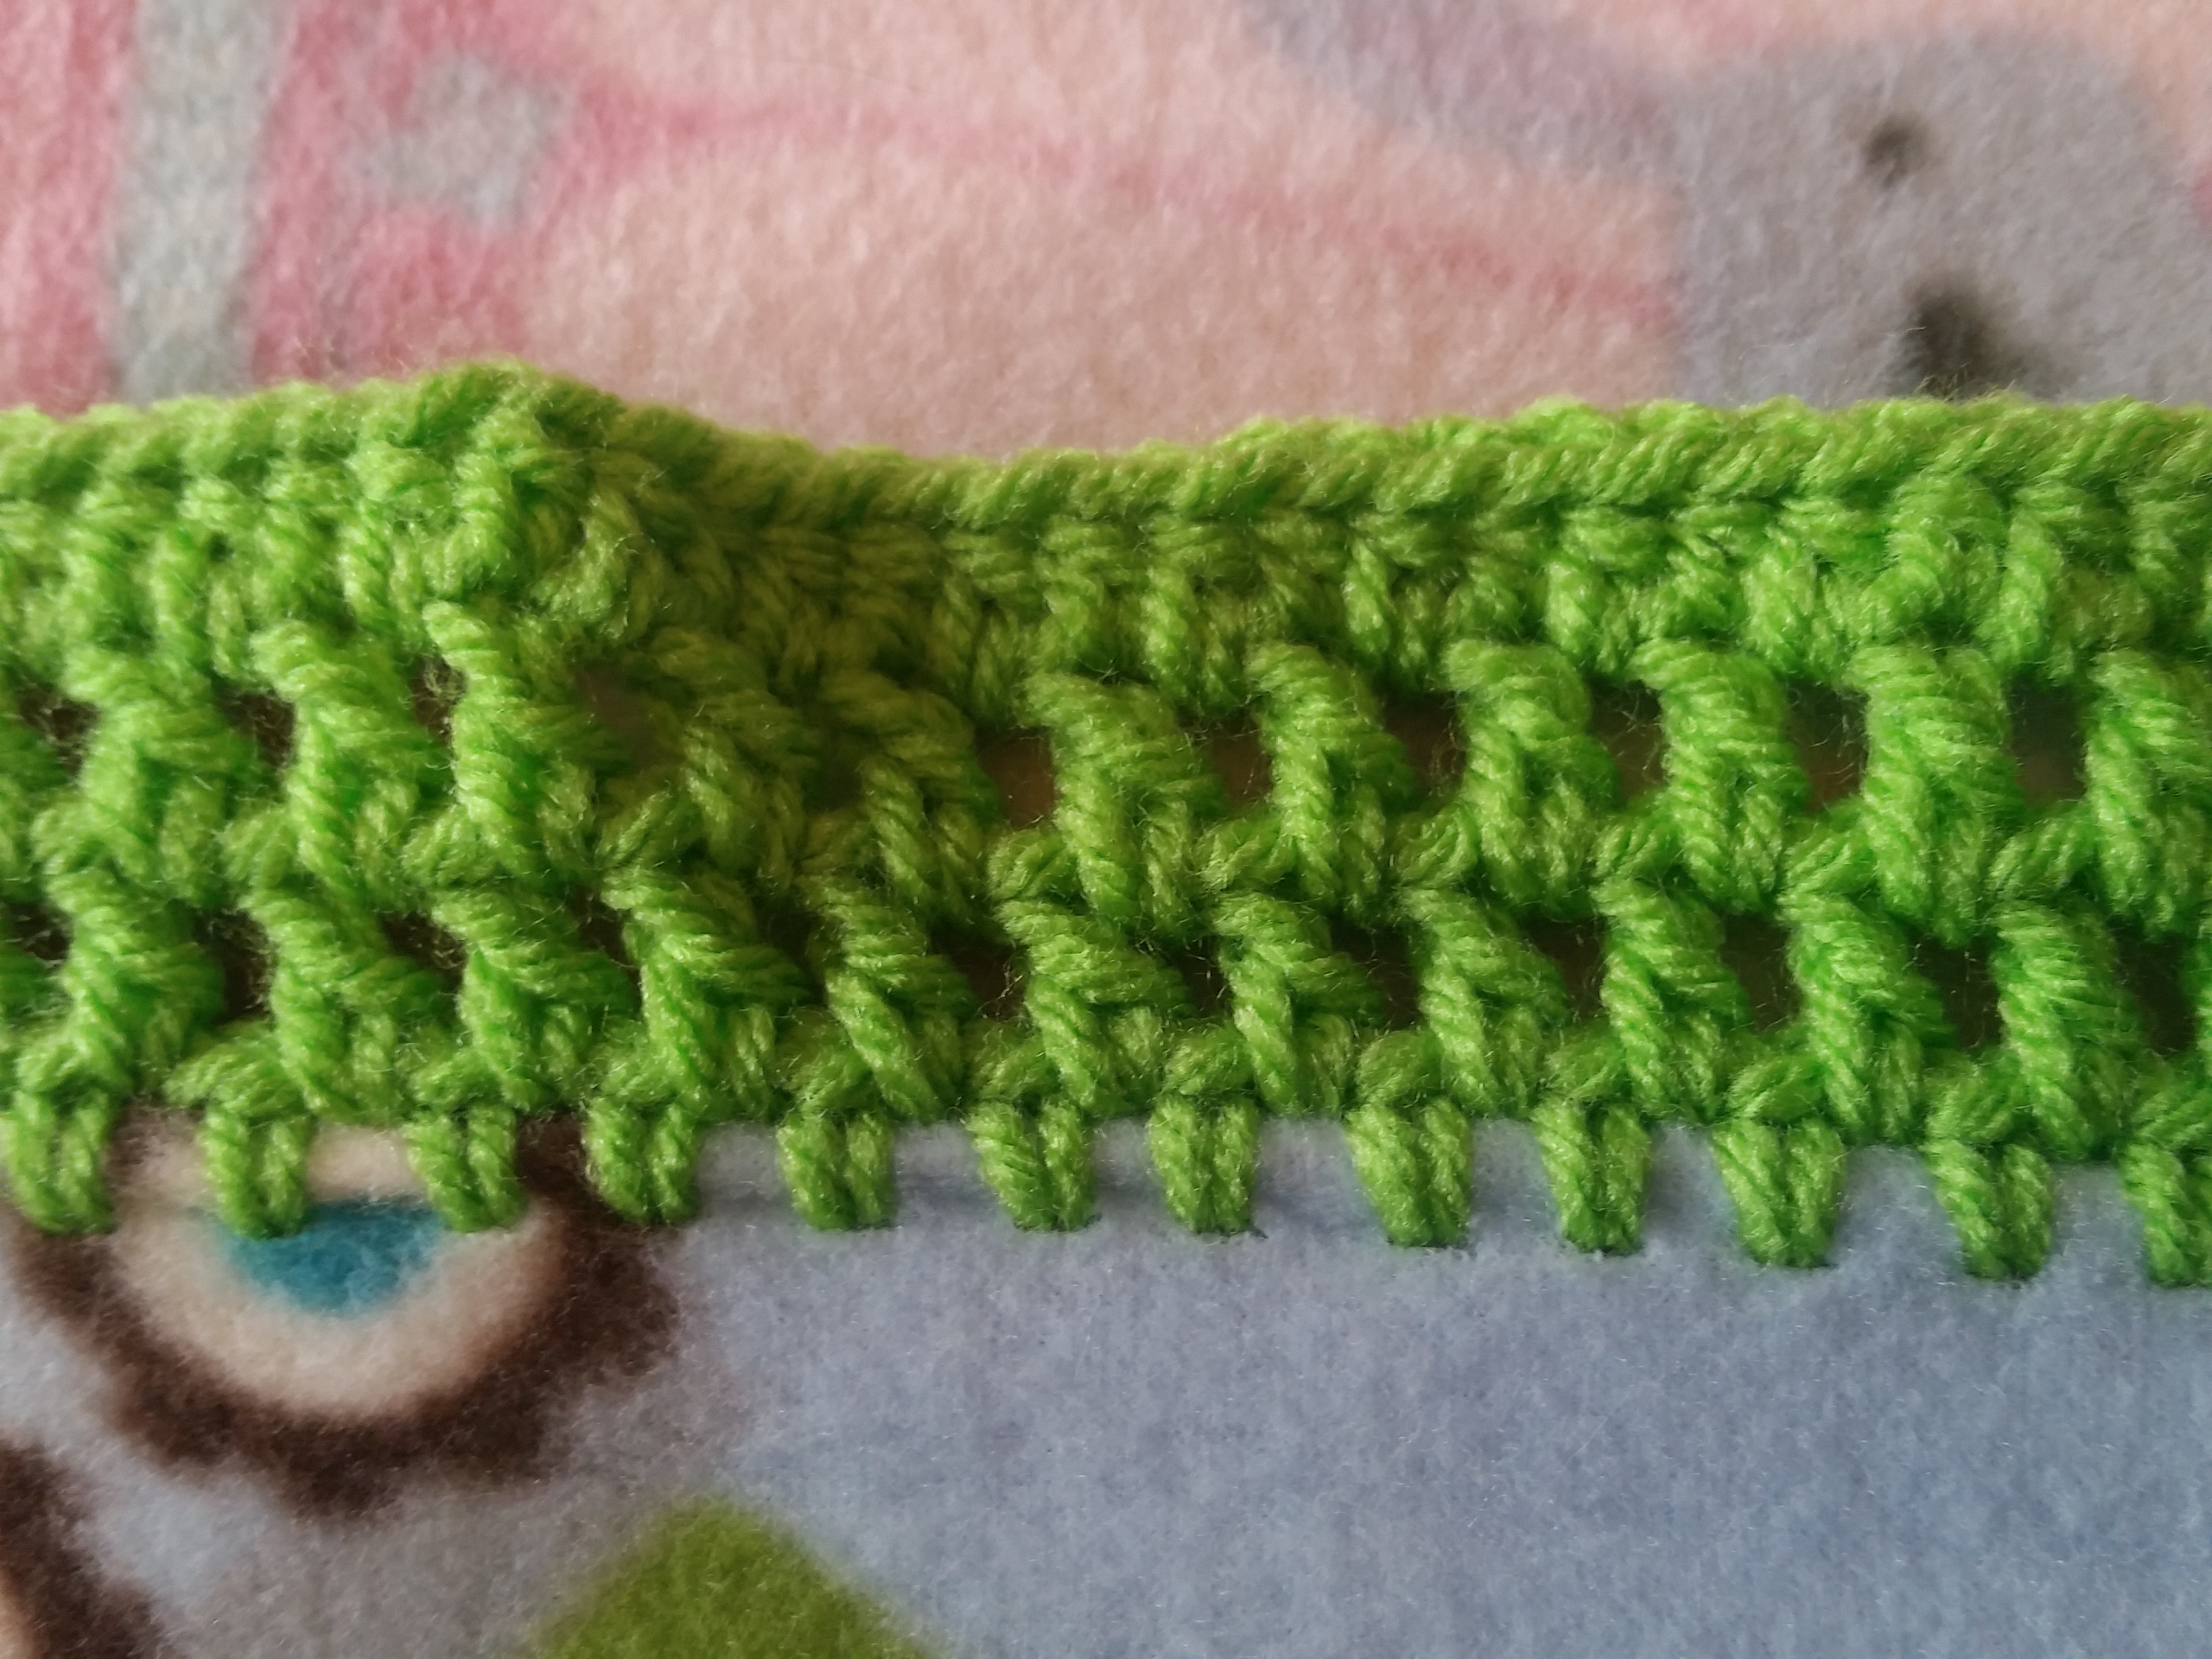
Part Three: The Edging
Now you are all set up to decide what type of edging you want to do. I have just been making it up as I go. And learning from my mistakes 😉 I will give you the basics of the three I have done but I didn’t follow a pattern. A quick ravelry search gave many choices.
This one was 2 rounds.
Round 1: Make 3 DC into every other stitch
Round 2. Work a 7 DC shell into every other middle DC. Slip stitch between.
Two rounds here too. It really could have used another round of at least HDC or maybe some shells but I was out of yarn so I just called it good enough.
Round 1: Chain 5, skip a stitch and slip stitch, chain 5 and repeat.
Round 2: HDC 4 times into each 5 chain.
This one is a chance for you to learn from my mistakes! I think the ruffling would be fixed if at the very beginning the DC was worked into every other stitch. Maybe. Or skip the chain one. Proceed at your own risk. I am giving directions for exactly what I did. The ruffling doesn’t bother me much.
Round 1. DC, chain one into each stitch.
Round 2: DC into each chain one.
Round 3: HDC into each stitch.
Even those this one is the least perfect it is really my favorite!
I know this was long but sure hope it was helpful! Please share on Facebook, Pinterest, Instagram, or wherever you would like!
When I saw this post on Mel’s Instagram I knew I had to know more about these jars. There is just something about the history and tradition of canning and canning jars that inspires me. When I can I like to reflect on back on what others put in the jars, what was going on in the world at that time, and how a basic tradition has pretty much stayed the same for a hundred years or so. Sure we know more about food safety but the basics and the hard work remains the same.
I’m not sure who found who on Instagram but I am so glad it happened. Mel shares beautiful pictures and stories about her family’s homesteading life. She also has a very interesting blog, Colibri Homestead where she goes more in depth about their homestead, recipes, family stories, and more. I encourage you to pay her a visit.
I commented on the Instagram post asking Mel if she would share with me the story of the jars. Thankfully she agreed and was inspired by my interest. Here is what she wrote.
Grandma G, what I’ve always called her since I’ve been part of the family, is in her mid-90’s and has dementia now. But before she did, she would tell the best stories, leaving out the nitty gritty and focusing on the sparkle and fun. At a time that I was yearning for and putting down roots, she talked about Seattle in a way that really drew me in; like she owned the town and knew all of it’s secrets.
My favorite of her stories are from during the Great Depression and WWII. While I’ve heard many stories of hardship from that time, hers always took on a different and fresh tone. Stories of her dad being able to keep his job as a foreman throughout the Great Depression, and because of it, having the only car in town. Stories of meeting and marrying grandpa, a Merchant Marine, and of working as a telephone operator, then for the Port during the war. Her war stories were of parties and dancing whenever grandpa was in town, and of getting early info on the ships that were coming in with goods so she could line up to get first dibs at the stores. I imagine that we could have been fast friends and wished to have known her and danced beside her during this time in her life.
Grandma G’s younger self always seemed so glamorous, and her wit makes her seem larger than life even now. But as the family cleans out her home to sell, I see more signs than I noticed ever before of a very practical woman. A woman who took good care of all that she owned, seemed to live rather simply so she could have plenty of fun, and who didn’t replace anything until it plumb wore out, as the light pink everything in her bathroom testifies.
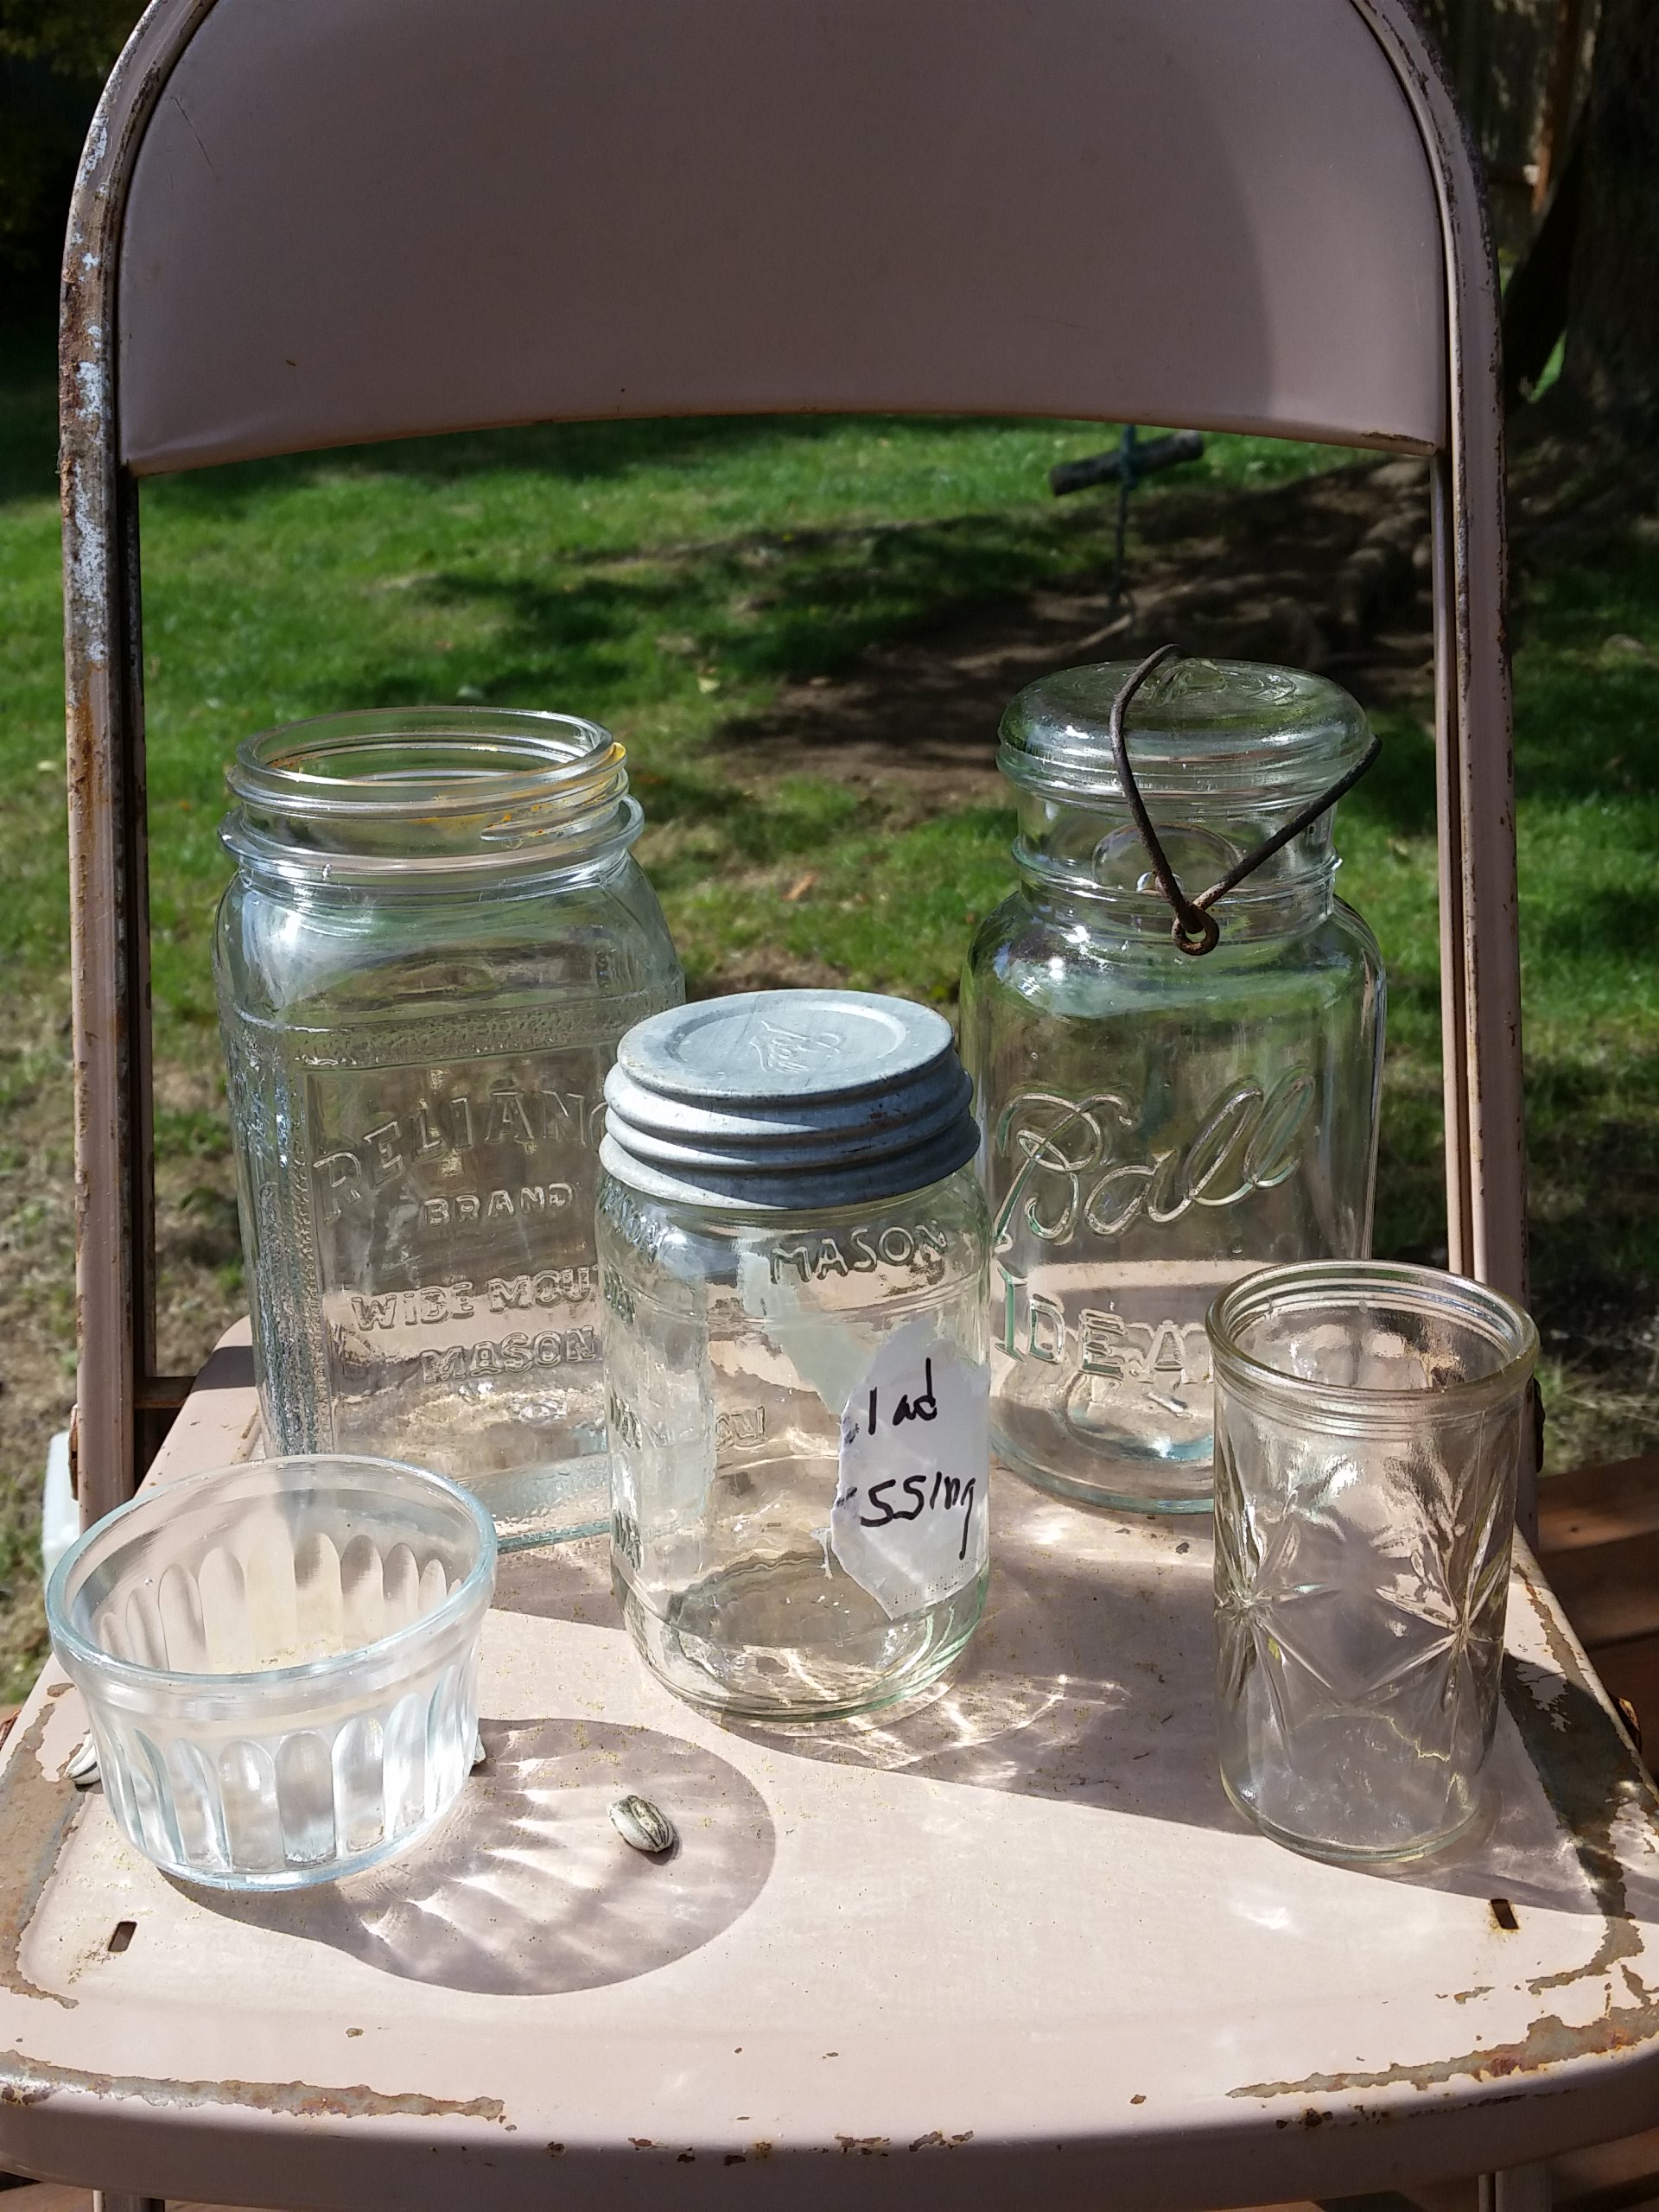
As the only current canner in the family, I’ve been the lucky one to inherit her old jars, dusty from sitting boxed up on the shelves in her basement. I’m going through them still, but have found starburst style juice jars from the 50’s that even my single-digit year old niece remembers drinking from when visiting Grandma G in her home, probably alongside her favorite dish to serve: shrimp louie, something that itself feels from a bygone era. A couple of the jars I’ve found date from 1923-1933, from when she was just getting her start in life. Perhaps these were her mother’s jar, passed down to her.
I’ve never heard of one of the jars before: Reliance Brand Wide Mouth Mason. I’ve since learned that Reliance was a coffee company in the Seattle area that packaged its product in their own labeled mason jars, and the practical side, or maybe also the Seattle loving side, of Grandma kept that jar. My favorite though is a simple mason jar with a zinc lid that has half a label still on it with enough of Grandma’s script for me to know it contained some of her homemade salad dressing. I plan to leave that one just as it is, maybe even for my grandkids to find in my shed one day.
For all the glitzy and glamorous stories Grandma G told and how they made it seem like she went through tough times unscathed, these jars remind me that she was also a regular person, eating, drinking, cooking, and doing the everyday stuff of life. And I learned something new about her too. She didn’t can anything else, but every year she would put up jars and jars of apple sauce. Apple sauce was her thing! Now to hope I find a recipe tucked somewhere in the jars, or that the family finds it as they pack up her house. Because I’d love nothing more than to make her some, canned in one of her old jars, in honor of her younger self. Until then, we can always chat over a shrimp louie.
Mel
A close up of the salad dressing jar.
All the jars on Mel’s busy homesteading dinner table.
Thank you Mel for sharing the story behind these jars. What a beautiful Everyday Heirloom. I am always on the lookout for more stories to share here at Your Everyday Heirlooms. If you have one to share please leave a comment or send me an email. YourEveryDayHeirlooms@gmail.com You can find us on Instagram too.
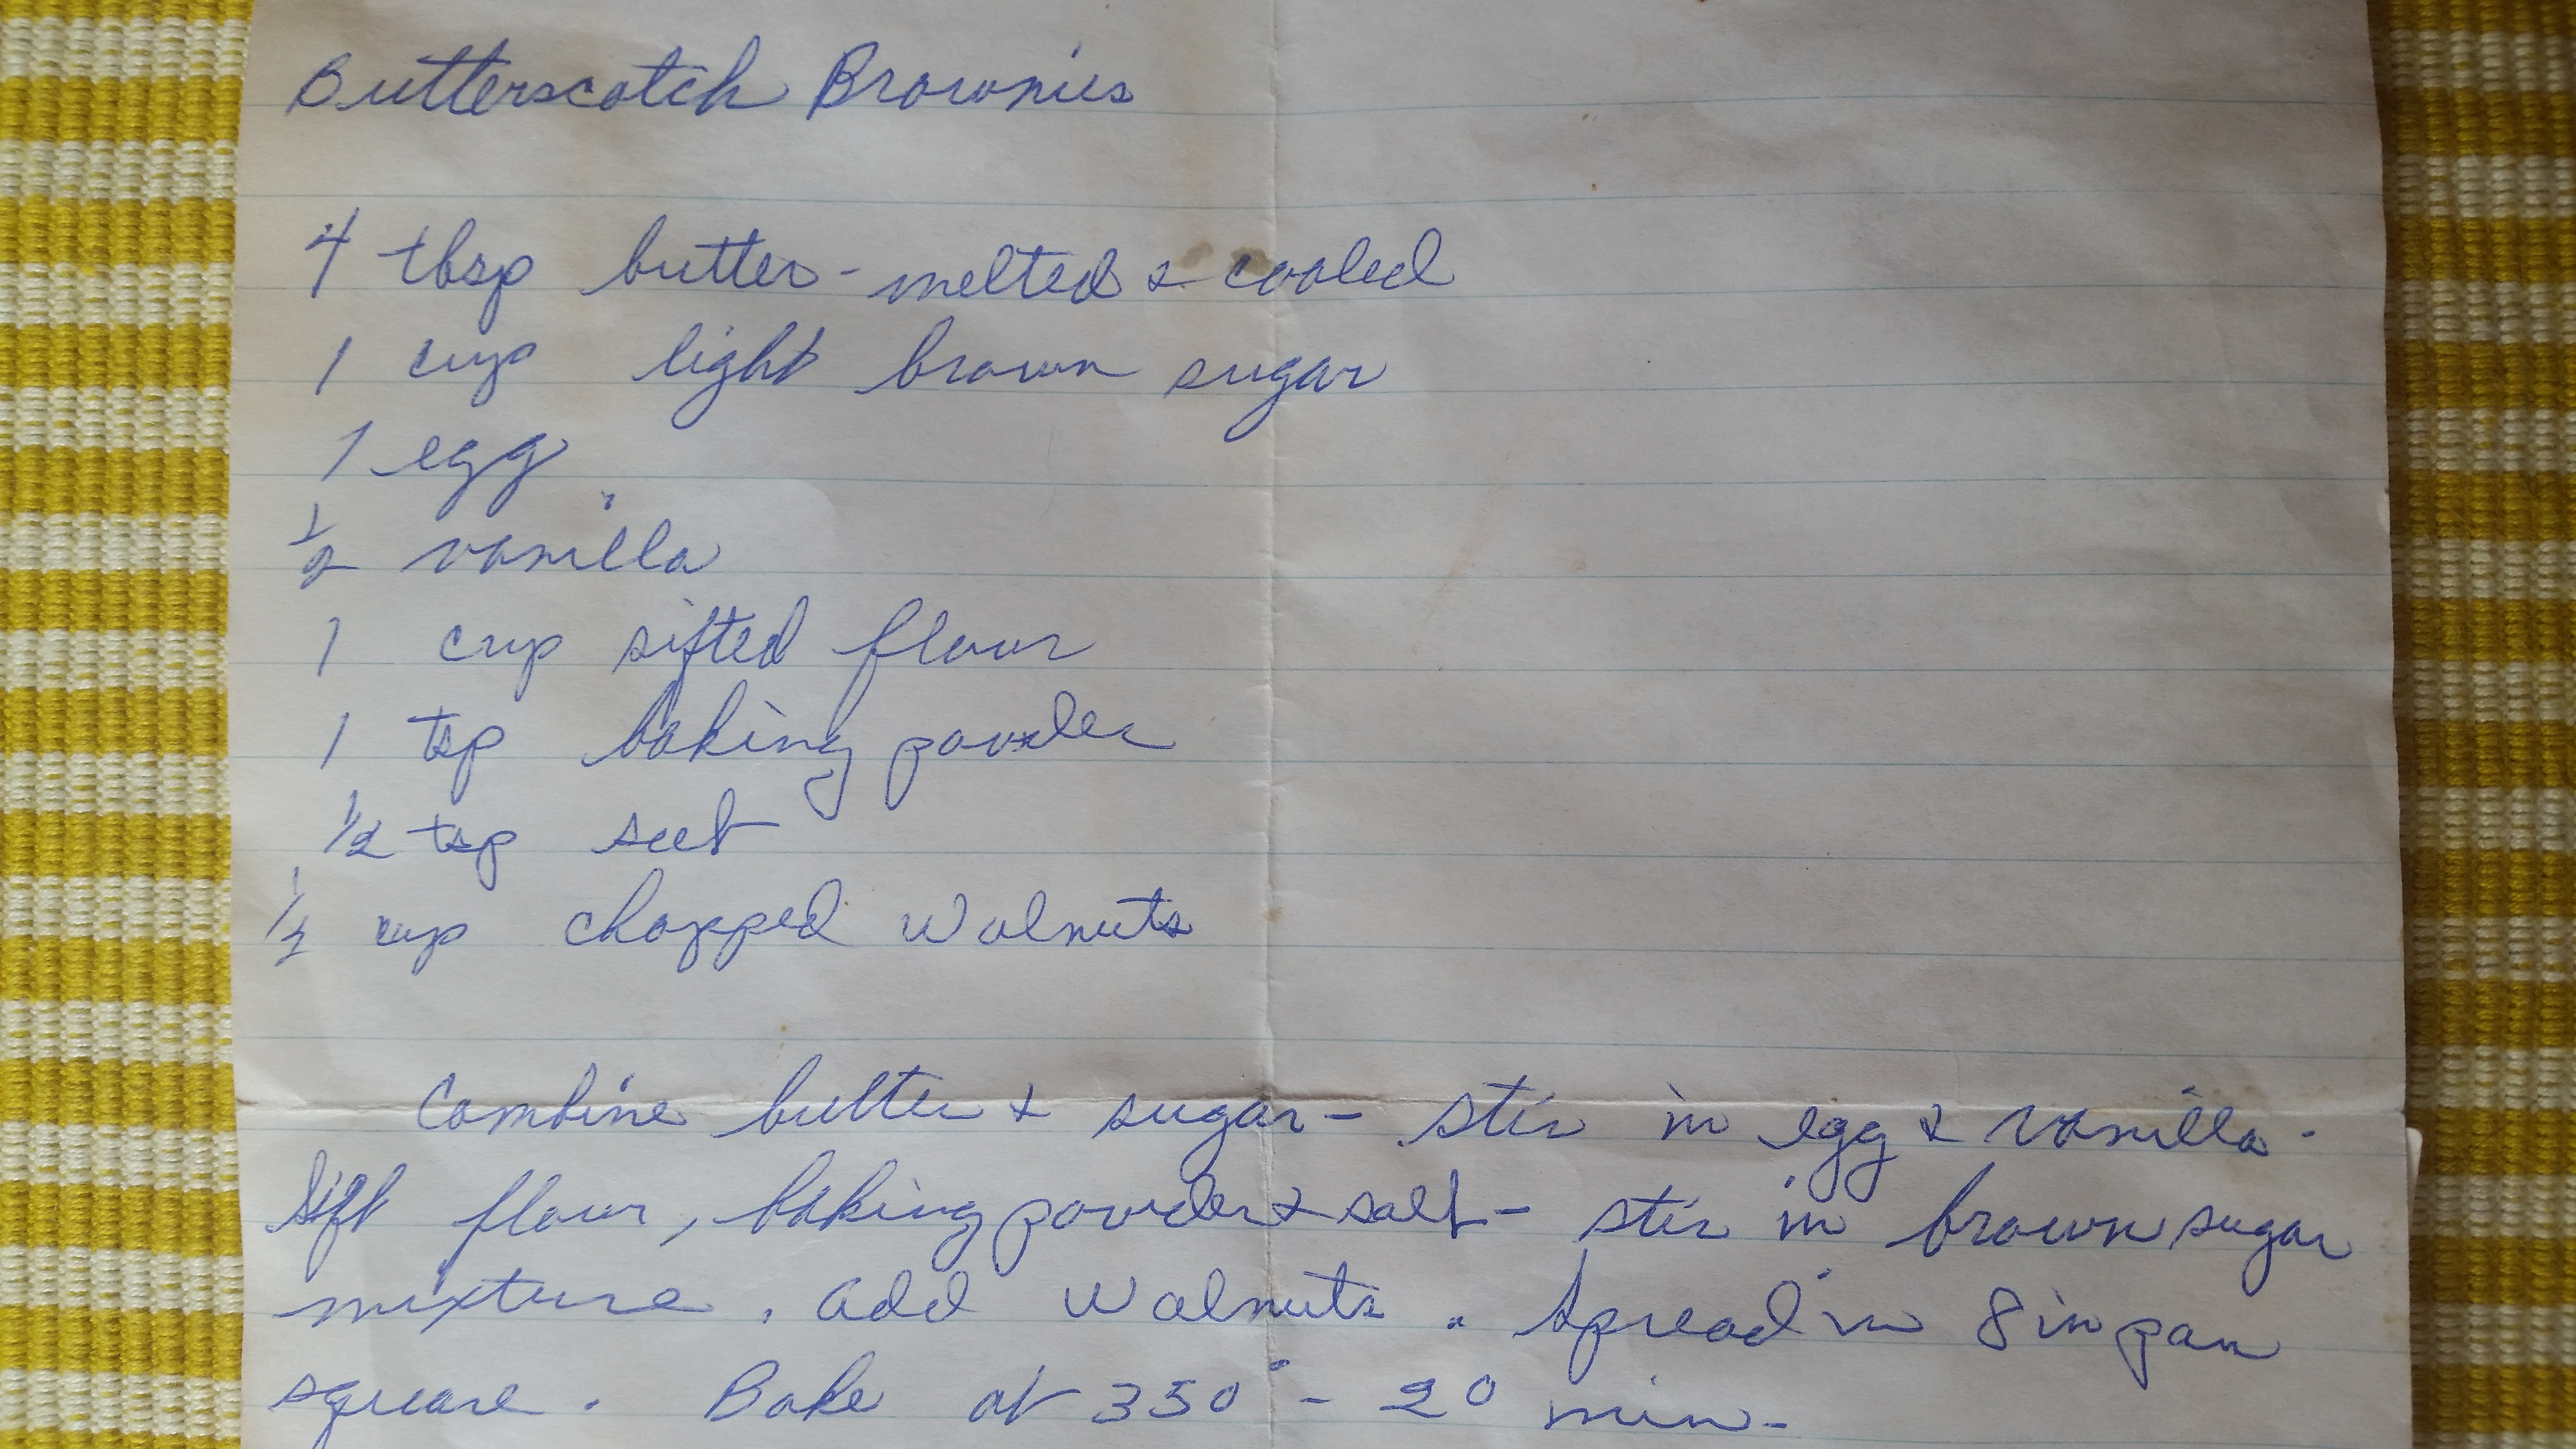
I am lucky enough to have received the recipe box of my husband’s Grandma. It is stuffed full of handwritten recipes, ones cut from magazines, and ones typed on index cards. I am making a point to go through it and see what I can find to make. When we were invited to a family cookout I decided that was the time to give the butterscotch brownies a try. Boy were they a hit! If you are looking for a cookout recipe look no more, this is it!
Grandma’s well loved recipe box
No one specifically remembered Grandma making these brownies but, food was a part of her love language. One of the main motivations for me learning to can is because of her. My husband claims home canned tomatoes made Grandma’s chili the best ever. Looking forward to cooler weather so we can see if I can come at least close to what he remembers. All of her children and grandchildren have many fond memories of delicious meals and desserts she prepared for her family. I am lucky she let me in on her secret ingredient for meatloaf! Maybe someday I will share it with the world.
I think they were especially enjoyable because they were Grandma’s recipe. I made them again to share here (and who am I fooling to eat some more of) and added my own twist.
4 tbsp butter melted and cooled – I didn’t cool the butter (terrible I know) or melt it all the way and they turned out great
1 cup light brown sugar – I assumed it is a packed cup.
1 egg
1/2 vanilla – She didn’t say teaspoon or tablespoon so I went with teaspoon.
1 cup sifted flour
1 tsp baking powder
1/2 tsp salt
1/2 cup chopped walnuts – The first time I made these I just skipped the walnuts. The second time I swapped the walnuts for white chocolate chips. Yummy. White chocolate chips were an excellent idea.
Combine butter and sugar. Stir in egg and vanilla. Sift together flour, baking powder, and salt. Stir in sugar mixture. Add walnuts or white chocolate chips. Spread in 8 inch square pan. Bake at 350 for 20 minutes.
The batter is very thick, like a dough. I pressed it to the edges with my fingers, not a spoon because it is really sticky.
Freshly baked.Served hot! We couldn’t wait! On a pretty plate my Granny gave me.
If you can’t wait and cut into them before they cool they will be very gooey and messy. Delicious but needing a fork. If you give the recipe a try I would love to hear what you thought! How does food play a role in your family traditions and memories?
Amy from Brotmanblog has very graciously agreed to let me share a beautiful story she blogged about. Her post Old Friends: Braided Forever is exactly the kind of thing I am hoping to explore with this blog. The amazing stories, friendships, laughter, and love with an everyday heirlooms. Stories shared like this is what makes Your Everyday Heirlooms a community. If you have a something to share I would love to hear it!
In the 1940’s Amy’s mother moved from Brooklyn to the Bronx. Not only did she have to leave behind her beloved dog Sparky but also her very best friend Beatty. Over time the two girls lost touch.
Amy’s mother asked her to try and find her old friend for her. Despite her best efforts Amy was unable to do so. As fate would have it Beatty was also searching and found Amy’s blog! She recognized Amy’s mother in the pictures and left a comment with her contact information. After over 70 years the two friends have reconnected. I am tearing up writing this! So often technology is talked about in a negative way. We need to disconnect more, get outside, talk to people in real life. All those things are true but blogs, social media, and in many other ways the internet can bring us together.
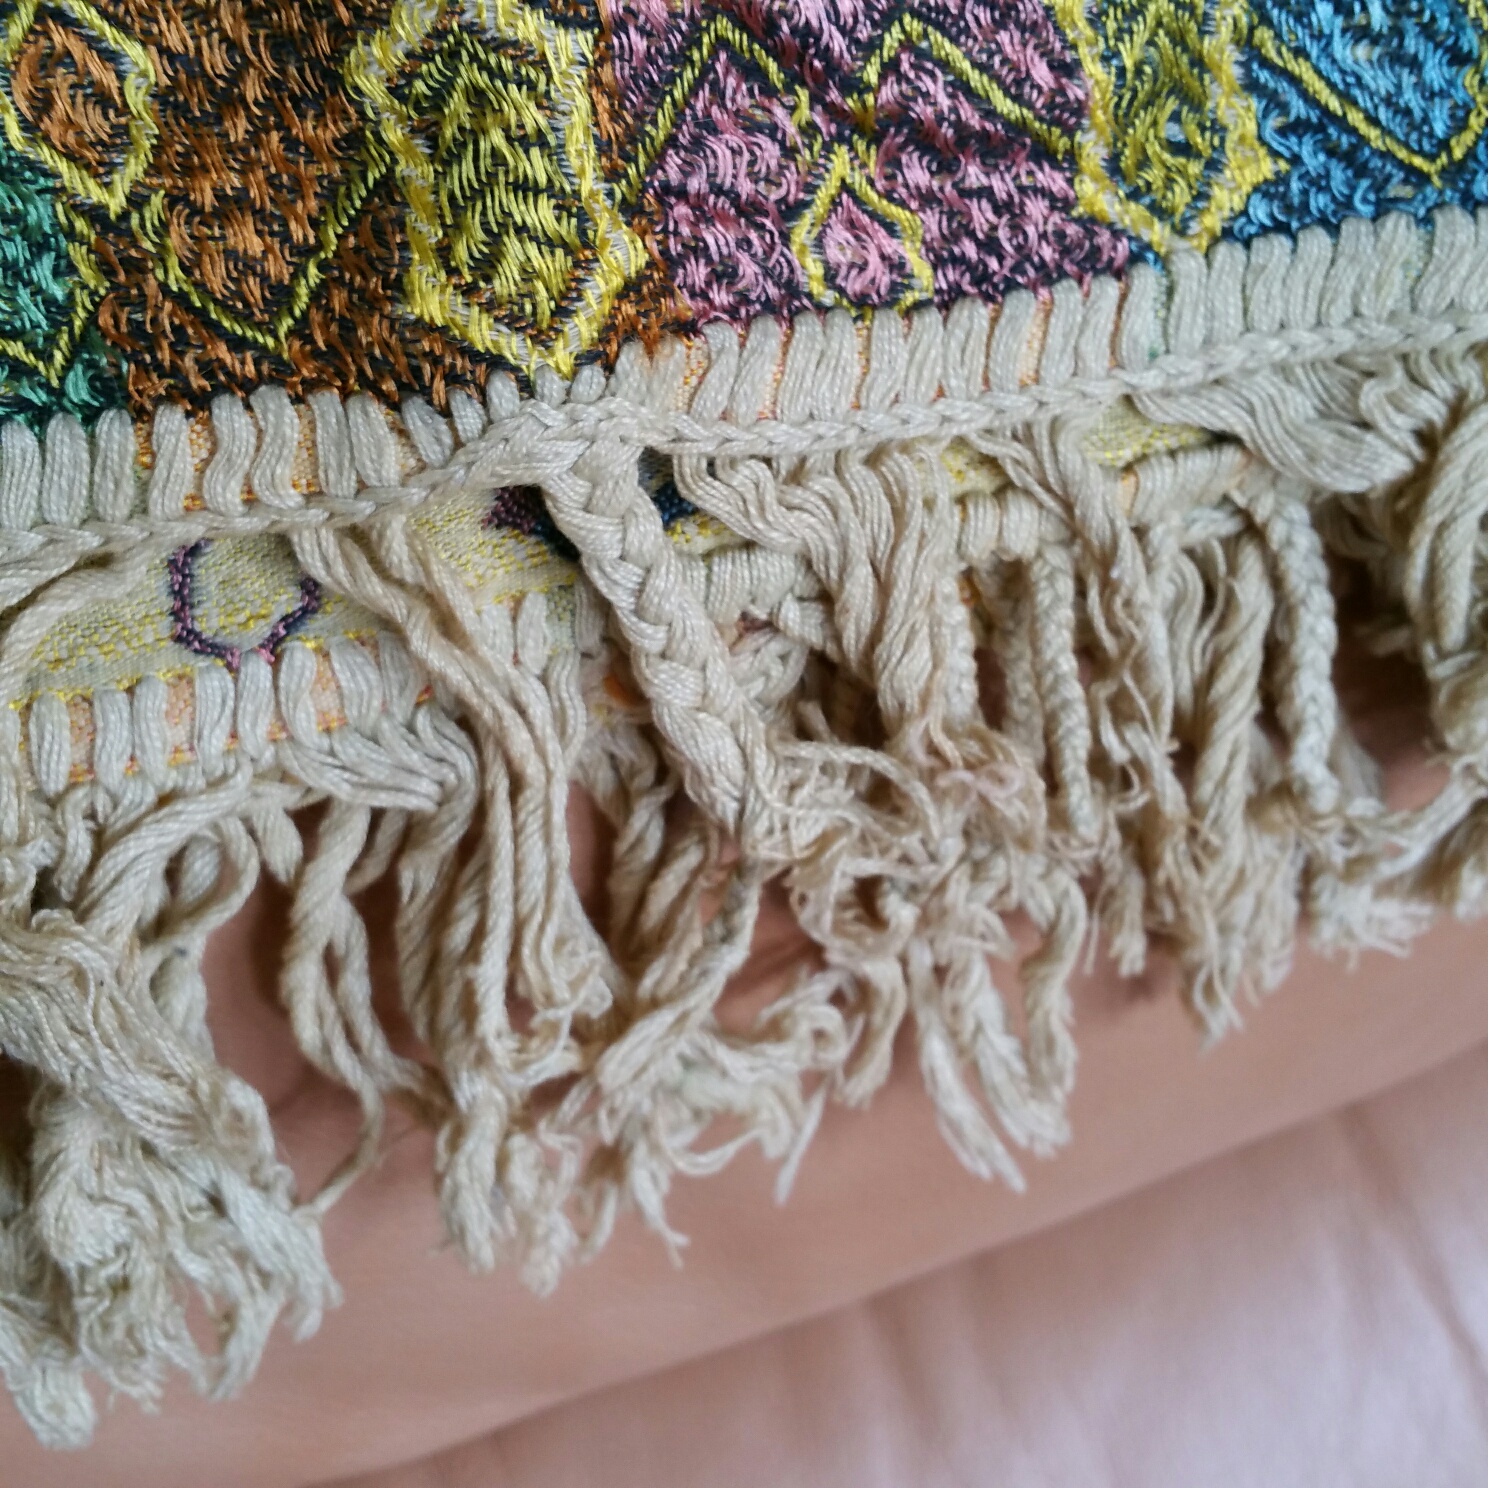
Here is the story of Beatty’s Seder tablecloth taken directly from Amy’s Blog with her permission.
One of the stories my mother shared with me was about Passover at Beatty’s house. Her father led the seder in a very serious way, and as many of us know, a traditional seder can get quite long and quite boring, especially for young children. To keep themselves from misbehaving and talking, my mother and Beatty would braid the fringes on the beautiful tablecloth that adorned the seder table. When my mother shared this memory with Beatty, she said that she also had shared that story with her children.
The tablecloth still exists, and even more remarkable, the braids made by my mother and her best friend Beatty are still there as well.
Here the tablecloth is in all it’s glory.
A close up of the braids Amy’s mother and Beatty made as children.
Showing all of the stunning tablecloth.
Thank you Amy for allowing me to share this beautiful story! Please visit Brotmanblog and join Amy as she discovers the history of her family.
After spending two days canning tomatoes, I was washing the jars and admiring my work. I knew that one of the Ball jars was from 1923-1933 but, wondered (ok hoped) that maybe one was even older.
If my research is correct the jar in front was made in 1915-1919. That’s at least 96 years old. Maybe even 100! Incredible!
Can you imagine all the different types of food that have filled this jar? How many people it has fed? The hard work growing, harvesting, and processing what went in it? The family traditions that took place with this jar? I do wish I knew more about the previous owners and the story behind this everyday heirloom.
My hope with this blog is to discover the history behind some ordinary objects that were used or created in the generations before. All things have a history.


 I spotted this new Johnsonville sausage flavor when getting the smoked sausage I needed for