Grandma S’s Cheesy Potatoes Recipe

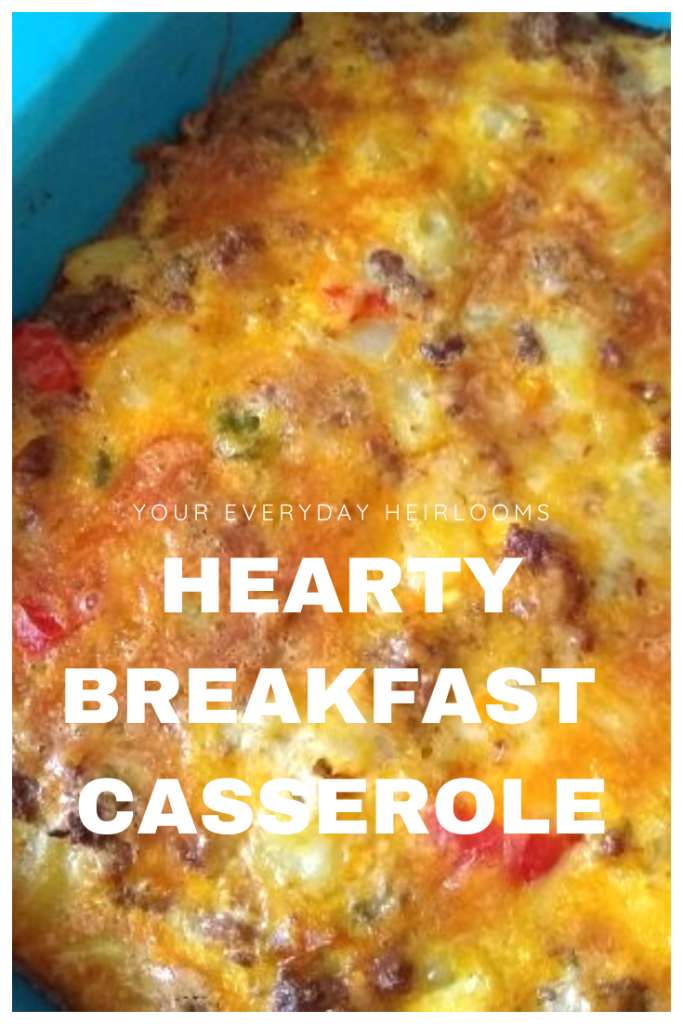
This is the recipe that must be present at every single family event. Having a cookout? Make cheesy potatoes. Christmas or Thanksgiving. Gotta have homemade cheesy potatoes. They are a family tradition! Even though this recipe is from my husband’s grandma its now a staple at events with my side of the family too!

Handwritten Cheesy Potatoes Recipe. Also called Potatoes Deluxe or Cheesy Hash Brown Casserole.

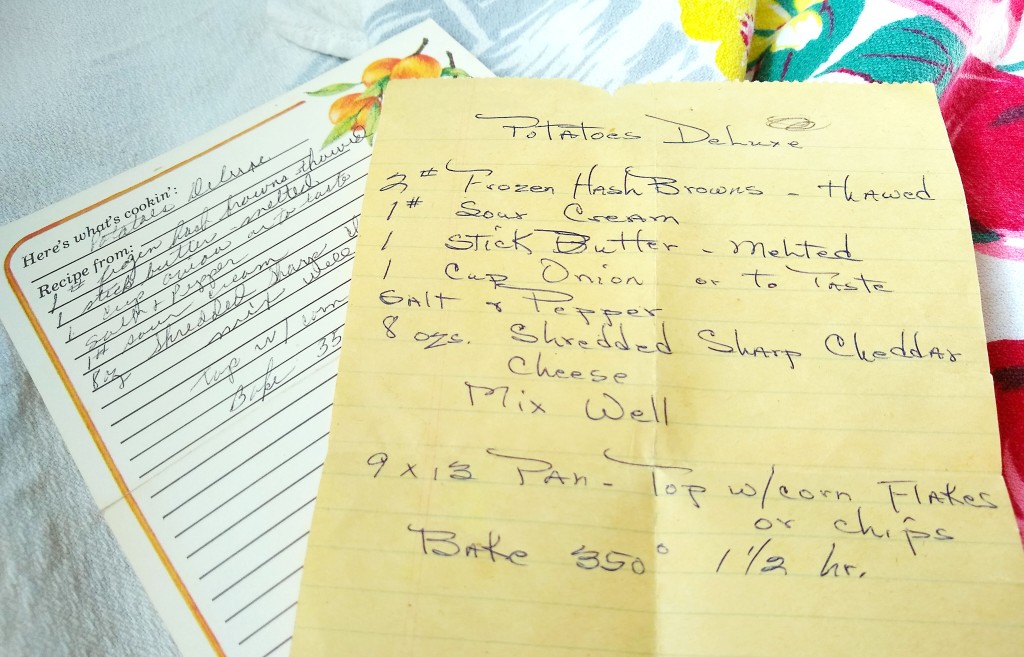
This recipe was in both Grandma R’s and Grandma S’s recipe boxes! They were friends so often I will spot Grandma S’s handwriting in Grandma R’s box and vice versa. However one recipe called for 1 pound of hash browns and the other called for 2. It’s 2! I was pretty sure it would be because that is how big a frozen bag of hash browns are. Thankfully this was easy to test because I know how they are supposed to look and can just start with half the bag.

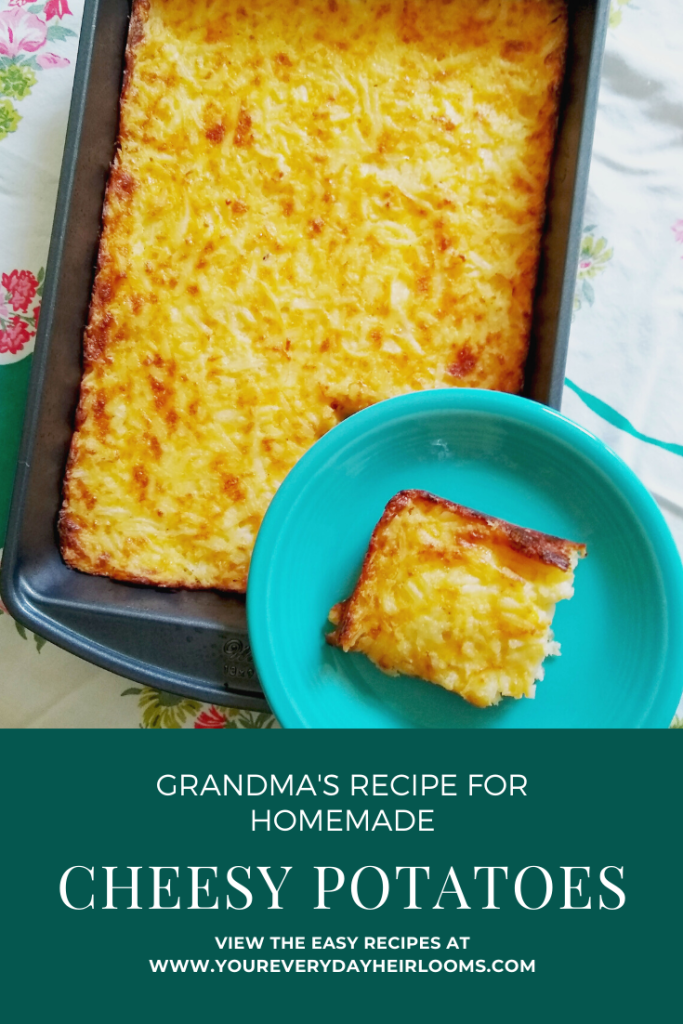
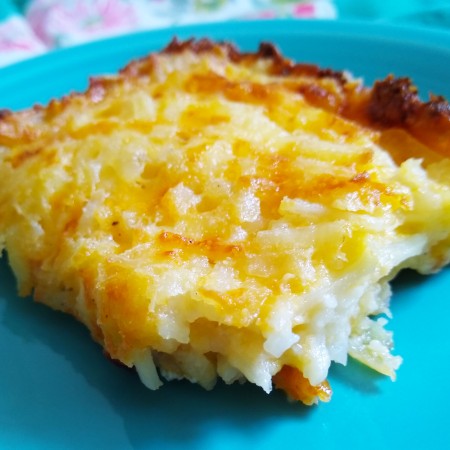
I know that the recipe calls them Potatoes Deluxe but that’s not the name that stuck! You know how that goes, you pick the perfect name for your child, and grandpa starts calling them Stinkpot and it sticks. That’s pretty much what we did with Cheesy Potatoes. To be even more confusing I say Cheesy Potato Casserole if I am baking them like I did this time but, if they are in the crock-pot they are just Cheesy Potatoes.

To further dishonor this recipe there are never any onions used. I have a theory it’s because my mother in law just can’t stand them so over time they have just gotten left out. I’m sure it would be delicious with the onions as written. I also almost never put anything on top. Sorry Grandma!

This is one of those recipes that I just make without measuring because I make them so much I don’t need to any more. Just to be sure for sharing I actually followed the recipe this time!

Cheesy potatoes. A cheesy hash brown casserole in a baking dish. Also a single serving on a plate.

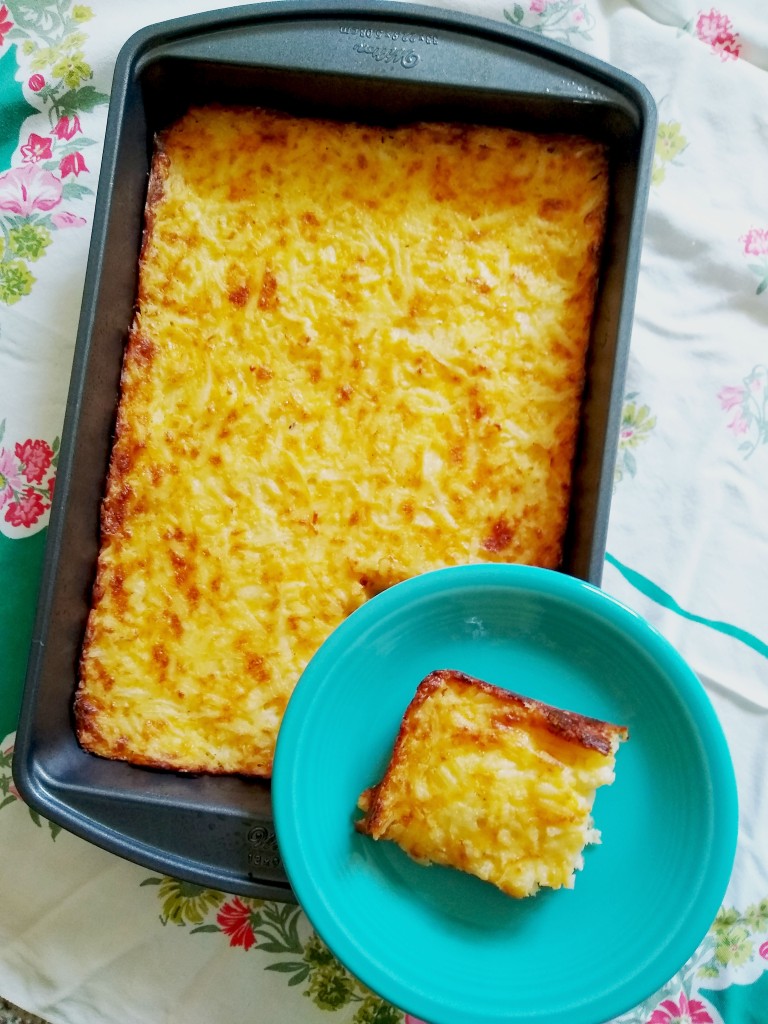
This picture is one of those extra sentimental ones I love. It’s Grandma S’s Cheesy Potatoes looking pretty on one of her vintage table cloths. I wish the Fiestaware had a history that I knew but it is just from my collection.

Grandma S's Cheesy Potatoes

  • Servings: 12
  • Difficulty: easy
  • Rating: ★★★★★
  • Print

Our family's must have side dish. Cheesy potatoes go great with everything but are especially good on holidays.

Optional: Add 1 cup of chopped onion. Top with corn flakes or crushed potato chips.


Credit: YourEverydayHeirlooms.com

Ingredients

  • 2 lbs frozen hash browns thawed
  • 1 lb sour cream
  • 1 stick of butter melted
  • 8 oz shredded cheese
  • salt and pepper

Recipe Instructions

  1. Combine all ingredients in a large bowl. Mix well.
  2. Spread evenly in a lightly greased 9×13 pan.
  3. Bake at 350 for 1 hour or until golden brown.

Nutrition

Per Serving: 307 calories; 26.2 g fat; 12.5 g carbohydrates; 7.2 g protein; 57 mg cholesterol; 205 mg sodium.

Optional Ingredients and Tips

  • Mix in 1 cup chopped onions.
  • Top with crushed potato chips or corn flakes.
  • You can use frozen hash browns just add about 1/2 hour to the cook time.
  • This also can be made in the crock pot. Just mix it all together and about 4 hours on high or 6 on low.
Close up of Cheesy Potatoes in the baking dish. Top is golden and edges are dark and crispy.
Those crispy edges are the best part! We all fight for a corner piece!

Need a main dish to go with these homemade cheesy potatoes? They go extra well with chicken! This recipe for Buttermilk Fried Chicken will walk you though all the steps to make perfectly crispy fried chicken. Looking for something a bit more healthy? Check out this Air Fryer Chicken recipe. There are also instructions for oven frying.

Don’t forget to make dessert! This super easy chocolate Wacky Cake recipe is good frosted or just sprinkled with powered sugar. Don’t want to bake? These no bake Canadian Cottage Cookies are packed with coconut, chocolate, and oat meal.

I’d love to connect with you on Facebook and Twitter!

Processing…
Success! You're on the list.
Image for saving on Pinterest with Cheesy Potatoes.

Follow my blog with Bloglovin

Apricot Bread

I love this easy apricot quick bread recipe! This apricot bread has a lightly citrus flavor and is deliciously fruity. With it’s light golden color and bits of apricot throughout it looks gorgeous!

This recipe was in the recipe box I found at an estate sale. I really wish I knew more to share with you about this apricot quick bread. It’s something I’d never even tasted before. As soon as I saw it in the box I knew I had to make it. When Costco had dried apricots on special it was finally time. I wish it hadn’t taken me so long.

You may have noticed that I am a fan of quick breads. These easy to make recipes are just perfect and remind me so much of my Grandma. As they bake quick breads really make your house smell so good, better than your favorite candle!

Grandma D made the most delicious lemon poppy seed quick bread I’ve ever had. Unfortunately I don’t have her recipe. I’ve tried several over the year but haven’t came close. If you have one please let me know.

Other Quick Bread REcipes You might enjoy

So far for the blog I’ve made Banana Bread and Cranberry Bread. We love them both! I’m pretty sure my teen son lets bananas go brown just so I’ll make him some Banana Bread! I think the Cranberry Bread is especially we suited for fall.

Apricot Bread

  • Servings: 12
  • Difficulty: easy
  • Rating: ★★★★★
  • Print

A light citrus flavored quick bread.


3/4 C chopped nuts may also be added when mixing in the apricot.

Credit: youreverydayheirlooms.com

Ingredients

  • 1 Cup snipped dried apricots
  • 2 Cups warm water
  • 1 Cup sugar
  • 2 Tbsp butter or margarine, softened
  • 1 egg
  • 3/4 Cup orange juice
  • 2 Cups flour
  • 2 tsp baking powder
  • 1/4 tsp baking soda
  • 1 tsp salt

Directions

  1. Soak apricots in warm water for 30 minutes.
  2. In a mixing bowl cream the sugar, butter, and egg. Stir in orange juice.
  3. Combine flour, baking powder, baking soda, and salt. Stir into the creamed mixture just until combined.
  4. Drain apricots well, add to batter. Pour into a greased loaf pan.
  5. Bake at 350 for 55 minutes or until a toothpick inserted comes out clean.
  6. Cool 10 minutes in pan before removing to a wire rack.

Nutrition


Recipe Notes

As usual I didn’t add nuts. If you enjoy them add 3/4 cup when you mix in the apricot pieces. I set my timer for 50 minutes but it needed the 55 like the recipe says! It smells so good while baking I kept thinking it should be done. I baked as a traditional loaf but if you want to try using your mini loaf pan be sure to adjust the baking time. I’d check it at about 35 minutes.

Processing…
Success! You're on the list.

This easy apricot quick bread would make a great addition to any dessert tray. The color is just gorgeous making it to pretty not to share. When I start my Christmas cookie extravaganza I’ll be making this to add to tins as well.

Have more apricots to use up? Check out this recipe for Chicken Breasts Stuffed with Apricots.

Soft and Fluffy Snickerdoodle Cookie Recipe

Everything you read is completely 100% biased because Snickerdoodles are my most favorite cookie ever! This recipe makes a very soft and fluffy cookie. Probably the best snickerdoodle cookie I have ever had. Not only are they delicious this snickerdoodle recipe is easy to make! No cream of tartar needed! All ingredients are basic pantry items, nothing to run out and buy here.

This recipe was in Grandma R’s recipe box. She kept her recipes neatly stored and very well organized. I really should try that out for myself! As I make these vintage recipes I rewrite them to store in my own recipe box. Or at least I intend to rewrite them and neatly store them

Snickerdoodle cookie history

The silly name had me wondering about where it came from. The Joy of Baking tells us a little snickerdoodle history.

Snickerdoodles are also called Snipdoodles or Cinnamon Sugar Cookies. Recipes for this cookie started to appear in the late 1800s, and most agree they probably originated in New England and are of either German or Dutch descent. This crinkly topped cookie with its coating of cinnamon sugar is often overlooked. Maybe it is because they are more plain looking than today’s creations or maybe it is because they do not use exotic ingredients.

Read more: https://www.joyofbaking.com/Snickerdoodles.html#ixzz6UjestQXl

Grandma R was of German ancestry so I wonder if that is why she had this snickerdoodle recipe or just because it’s a classic, easy to make cookie.

Interesting they also talk about why they don’t seem to be as popular. I’ve wondered that myself! Cinnamon and sugar is such a classic combination it’s a shame these wonderful cookies aren’t more widely loved.

Soft and Fluffy Snickerdoodle Cookies

  • Difficulty: easy
  • Rating: ★★★★★
  • Print

Grandma's classic snickerdoodle cookie recipe. Soft, fluffy, and easy to make


Credit: youreverydayheirlooms.com

Ingredients

  • 2 eggs
  • 1 1/2 Cups sugar
  • 1 Cup shortening
  • 1/2 tsp salt if using oleo
  • 2 3/4 Cups flour
  • 2 tsp baking powder
  • 1 tsp baking soda sugar
  • 2 tsp cinnamon
  • 1 Tbsp sugar

Directions

  1. Mix: eggs, sugar, shortening, and salt.
  2. Sift together: flour, baking powder, and baking soda
  3. In a bowl combine cinnamon and sugar.
  4. Mix together. Chill for 1 hour. Roll into balls the size of a walnut. Roll into cinnamon and sugar mix. Place on lightly greased cookie sheet.
  5. Bake at 350 for 8 minutes

Desserts are my favorite thing to make! Here are some of my other cookie recipes you will want to check out:

4 Ingredient Peanut Butter Cookies these cookies are so easy to make and only use 4 ingredients. They also just so happen to be gluten free. Not one of those normally yummy recipes that have been modified to exclude gluten either.

Perfect for summer these Canadian Cottage Cookies are a different version of the classic no bake cookie. No oven needed1

Potato Chip Cookies are the perfect combination of sweet and a tiny bit salty. Everyone raves about these unusual treats.

If you are in the mood for Dessert Bars check out this post. It has links to all the vintage dessert bar recipes I have tried so far.

I’m so glad you are here! Please sign up to my newsletter to be alerted when new recipes are posted. You can also find me on Facebook, Instagram, and Twitter.

Processing…
Success! You're on the list.

Chicken Tetrazzini

I had this recipe set aside in my to make soon pile for way to long! Chicken Tetrazzini is such a great creamy pasta dish I knew my family would love it. I tried to tempt my son with his choice of frozen entrees at the grocery store but he wasn’t interested. “Can’t you just make something”? Ok fine, of course. Now I do appreciate that he loves my cooking but sometimes you just want to go the easy route.

Chicken Tetrazzini isn’t a hard recipe to make but it’s not super quick. The directions for this one were very unclear too. I did some quick research, went with my cooking intuition and it turned out really delicious!

This recipe was in the wooden recipe box I purchased at an estate sale. I really am so glad to have this treasure but it always makes me feel bad that it wasn’t something any of her family wanted. Its a beautiful box crammed full of neatly sorted recipes. Don’t worry Mrs. I’m loving and sharing them.

While this was a delicious dinner that we all enjoyed it really wasn’t super photogenic so I apologize for the less than flattering photographs. I’m working on a new set up and that should really kick them up a notch. It doesn’t help that when I share a main course like this it’s my families dinner so they are all waiting while I play photographer! My pretty Fiestaware dishes do help!

Stuffed Manacotti and Coffee Cake Muffins are two other uglies but goodies! We always joke that if something turns out looking ugly it will likely be especially yummy!

Chicken Tetrazzini Recipe Notes

If you don’t want to read my whys and hows just scroll down to the recipe card! I’ve added all the changes there for you!

Just a few notes before we jump right in to the recipe. Like I said before the directions on this card were not very clear. This is just the way I made it and it came out great. I didn’t put in green pepper because my son won’t eat it. I’m sure that and onion would be great in it. For the mushrooms I drained them and sauteed just a bit for extra flavor. Next time I will try it with fresh.

Since I was not making this the day before I went ahead and did everything except boiling the pasta and cooking the chicken in my large dutch oven. It worked great but you could use a large sauce pan and transfer to a baking dish. I love using the dutch oven so I use it whenever I can!

The chicken can be prepared however you prefer, or use a rotisserie chicken. I pressure cooked frozen chicken breasts in my Ninja Foodie. Super fast and easy. Especially handy when you forget to plan ahead! Mine were frozen in a solid lump so it took 15 minutes on high. If you freeze yours individually it would be 12 minutes. Some day I will repack them and not just come home from Costco and toss them in the chest freezer. Or maybe even remember to thaw the day before.

As written this recipe was extremely bland. You will want to be sure to taste and season the sauce a bit more. My chicken broth was salt free (it’s all there was) so it needed a significant amount of more salt. I used at least 2 tsp of chicken bouillian. I also added about 1/8 C more sherry and extra pepper. I will be changing those measurements in the recipe card bellow.

Parmesan cheese gives such a good flavor I decided to ignore the recipe and add some to the sauce as well. Can’t go wrong with extra cheese!

My timing was off when boiling the spaghetti noodles so I drained them, rinsed, and then gave them another quick rinse before mixing them in.

Chicken Tetrazzini

  • Servings: 6-8
  • Print

A classic chicken and pasta dish.

This also freezes very well! Prepare as directed, transfer to freezer safe dish, cover and freeze. Or make the day before.


Ingredients

  • 2 C chopped or shredded chicken
  • 6-8 oz spaghetti noodles
  • 6 oz can of drained mushrooms or fresh
  • 1 C Parmesan cheese
  • 1/4 C butter plus 2 TBSP to saute mushrooms
  • 1/2 C flour
  • 2 3/4 C reduced sodium chicken broth
  • 1 C half and half
  • 1/3 C dry sherry
  • 2 tsp chicken bouillon or salt more to taste
  • large dash of pepper

Directions

  1. Preheat oven to 350. Bring a large pot of salted water to a boil, for spaghetti noodles. In a dutch oven or large saucepan, melt 2 tablespoons butter. Add mushrooms season to taste with salt and pepper. Cook until lightly browned, about 10 minutes, transfer to a dish and set aside for later. Cook pasta about 2 minutes less than directed, drain, and rinse.
  2. For the sauce: In same pan you used to brown the mushrooms, melt remaining 4 tablespoons butter over medium heat. Add flour, whisk for about 3 minutes until browning slightly. Whisking constantly, very slowly add half and half, broth, and sherry. Bring to a boil; reduce to a simmer, and add 1/2 C Parmesan, chicken bouillon, and pepper. Add more pepper and bouillon (or salt) to your tastes.
  3. Add, chicken and mushrooms to the sauce. Stir well. Mix in the spaghetti noodles. If using a dutch oven sprinkle with remaining Parmesan. Or transfer to a baking dish and then top with Parmesan. Bake until browned, about 30 minutes.

This recipe is great to make the day before or to make and freeze. You could easily double the recipe and just freeze half.

I hope you enjoy this recipe! We really did. The super picky teen appreciated the classic creamy sauce.

Check out my other pasta recipes: Cavatini, a classic pasta with red sauce. Super easy to customize to your families preferences. Grandma S’s Baked Stuffed Manacotti cheesy stuffed shells.

Summertime Favorites: Try These Recipes for Your Next BBQ

I just love taking a dish to pass to a BBQ, cookout, potluck, family event, whatever you want to call it I want to bring something! Maybe it’s a little bit to show off but I really do enjoy cooking for others. I’ve gather up some of the best BBQ side dish recipes I could find to share with you! Let me know what you decide to make.

Usually I like to make a side dish or salad and a dessert. I have already made a post with my Favorite Dessert Bar recipes so I won’t repeat those here. Dessert bars are especially well suited for sharing. Be sure to check that post out!

Salad Recipes

Summer time cookouts always have me wanting something cool and fresh! Here are some of my favorite salad recipes for you to try:

This Broccoli Salad recipe is one of my personal favorites. It’s a vintage recipe that I’m sure you have had at some point. The combination of sweet and tangy is perfect for summer. Make this one at least a few hours before but its best if it can sit overnight. My hubby wanted me to skip the raisins because “that’s weird” but as usual I didn’t listen and he liked it just fine. Don’t let the odd combination scare you!

Dairy Free Balsamic Blueberry & Broccoli Salad is fresh take on the more traditional Broccoli Salad I’ve made. Using dairy free yogurt instead of mayonnaise keeps this allergy safe for those with a dairy allergy. It’s not necessary but is better for this to be made at least an hour ahead of when you plan to serve it.

Summer Pickled Cucumbers might be my Mom’s favorite food! Simple and fresh they are perfect for your summer parties. Not only great as a BBQ side dish these go great on hamburgers or hotdogs. Double or triple this if you have an excess of cucumbers from your garden.

Corn & Black Bean Salad is an easy and colorful salad that happens to be both vegan and paleo! Not only is a great for a cookout recipe it will also make a great side dish for your favorite Mexican meal. You could even bulk it up on a bed of spinach or greens and have it for Meatless Monday.

For something a bit different that everyone will love try this Refreshing Mango Salsa Salad. I think this would go especially well with fish or chicken.

Cookie and sweet treat Recipes

You can’t go wrong taking something sweet! Who doesn’t like dessert? I’ve made a point to only share easy recipes here. Two just happen to be gluten free! And one has a surprise ingredient. We haven’t forgotten our vegan friends either. Too hot to turn on your oven? Don’t worry I’ve got a no-bake cookie recipe for you too!

Potato Chip Cookies are the perfect combination of sweet and salty. Everyone loves this vintage recipe and is surprised to find out what makes them so good is that they have potato chips in them! This might be one to make after your cookout with mostly gone bag of chips that always seem to be leftover!

Too hot to bake? No problem! Try these Canadian Cottage Cookies. The addition of shredded coconut and nuts really makes these easy no bake cookies tasty. Don’t care for nuts? No problem just leave them out and use a bit more shredded coconut.

These are my number one most often made cookie. Why? They only take 4 ingredients!!! Peanut butter, egg, sugar, and vanilla. That’s it! Heck you could even skip the vanilla if you wanted! I hope you will give these 4 Ingredient Peanut Butter Cookies a try! These also happen to be gluten free!

If you want to take just a little something Grandma S’s Butterscotch Brownies would be an excellent choice. They make a small 8×8 pan.

Gotta have cake? This chocolaty cake from the depression era is just what you need. Wacky Cake uses no eggs or oil. Like the Butterscotch Brownie recipe this only makes a 8×8 pan. Perfect for a smaller gathering. Another one of those old fashioned recipes that happens to meet special diet rules, Wacky Cake is vegan.

I hope you have found a new favorite summer time recipe. This truly is a collection of the best of the best! Find me on Facebook or Twitter and tell me what you made!

A special thank you to my talented friends at Foodie Home Chef and Not Quiet Super Mom for letting me share a couple of their best recipes with you! Be sure to check them out

Hearty Breakfast Casserole

This is the perfect recipe to keep your weekday mornings running smoothly. I like to make it Sunday and then have the leftovers available for the week. This makes 6 large servings or 8 smaller ones. This Hearty Breakfast Casserole reheats extremely well.

Along with being delicious and quick to make its also extremely easy to customize to your families tastes. Choose whatever meat and veggie combination you prefer and go! You also could just skip the meat for vegetarians and load up on vegetables.

Suggested Combinations

  • Sausage, bacon, potato, onion
  • Chorizo, potato, peppers, onion *This is what I used*
  • Ham, spinach, potato
  • Grilled chicken, spinach, feta, mushrooms

Really there are so many choices! It would also be good for using up leftovers. Chop up that lonely baked potato and toss it in! In the recipe I’m sharing what I used and those amounts but it is really forgiving and works with so many different ingredients.

Try it Smoked

We recently purchased a pellet smoker and in looking for new ideas of things to smoke I found this Smoked Breakfast Casserole recipe. If you have a smoker be sure to check out Malcom Reed at How to BBQ Right. He has so many great recipes and is really enjoyable to watch!

Malcom’s recipe wasn’t quite exactly what I was looking for so I heavily modified it. We didn’t need it to be such a large size and I didn’t want to use crescent rolls. The first breakfast casserole we did bake on the smoker and while it added a bit of that smokey flavor I don’t think it was really necessary at all.

Hearty Breakfast Casserole recipe

Like I mentioned earlier really just use this as a guide and not as set in stone must follow exactly. When you do try it I’d love to hear what you added. Tell me over on Facebook or Twitter @YEDHeirlooms.

Ingredients:

  • 1lb Chorizo or Breakfast Sausage
  • 8 eggs
  • 1/4 C milk
  • 1 C green peppers and onions
  • 1 1/2 to 2 C diced potatoes or hashbrowns
  • 1/4 C shredded cheese
  • Seasonings salt and pepper, adobo, whatever you prefer

Preheat oven to 350. In a large skillet brown your sausage and drain. In the same skillet add the vegetables and cook until they are close to done. I used frozen. Spray a 9×13 baking dish with nonstick spray. Evenly spread the meat and vegetable mixture. Top with cheese. Whisk eggs, milk, and seasoning. evenly pour over the whole dish. Use a spoon if needed to press on the meat mixture to be sure it all gets a good coating.

Bake at 350 for about an hour. Check at 45 minutes to be safe. It will be nicely golden brown and the center will be totally set.

Serve topped with sour cream and chives if you like.

The eggs should almost cover the meat, veggies, and cheese.

About Chorizo

Chorizo is a highly seasoned pork sausage. It’s delicious. I remove it from the casing for this recipe. I also like to dice potatoes really small and cook those in already browned chorizo for the best ever tacos.

We are fortunate to have an amazing Carniceria, a Hispanic butcher shop, in our town. They have excellent fresh produce and a full service meat counter. My Spanish is pretty terrible but they are very helpful and we get by just fine.

If you don’t happen to have a local carniceria I have seen chorizo at our local grocery store too. You can’t beat fresh made so I really encourage you to seek it out.

3 Vintage Sourdough Recipes That Aren’t Bread

Did you make a sourdough starter during the pandemic? Sick of making bread? Here are 3 vintage recipes for you to try, that aren’t bread! Rolls, Banana Bread, and Biscuits! Plus one small ingredient swap and you can have shortcake instead! All from Grandma R’s recipe box so you know they are good.

Need to make a sourdough starter? Here is one to get you started. Beginner Sourdough Starter Recipe.

I’ll be sure to update once I’ve tried them all! Stay tuned.

Sour Dough Rolls

I can almost smell these! Who doesn’t love rolls? You can’t beat fresh bakes sourdough rolls. Definitely don’t forget to brush with butter at the end. Yum.

Ingredients:

  • 1 package dry yeast
  • 1 1/2 C warm water
  • 1 C sourdough
  • 2 tsp salt
  • 2 tsp sugar
  • 5 1/2 to 6 C sifted flour
  • 1/2 tsp soda

In a large bowl soften yeast in warm water. Blend in sour dough, salt and sugar. Add 2 1/2 C flour. Beat 3-4 minutes with an electric mixer. Cover. Let rise about 1 1/2 hours. Combine soda and 2 1/2 cups flour, stir into dough, add enough to make a stiff dough.

Turn on floured board and knead 5-7 minutes. Cover about 10 minutes. Shape into rolls or bread. Place on greased baking sheet.

Bake at 375 for 35-40 minutes. Brush with butter.

Sourdough Banana bread

Now I already have a favorite banana bread recipe. I make it at least once a month to use up all those bananas that go brown too fast.

Tip: Once a banana is looking good and brown (you know the one) I toss it in the freezer. When you have 2 or 3 saved you are ready to make banana bread. If you are like us it won’t take that long! Pull what you need out to thaw, cut the tips off, and squeeze right into the bowl. They are already mashed.

Like I do in my other banana bread recipe I’d likely use brown sugar in this. Brown sugar just really gives an extra kick to banana bread.

Ingredients:

  • 1/3 C shortening
  • 1 C sugar
  • 1 egg
  • 1 C sourdough
  • 3/4 chopped nuts
  • 1 C mashed bananas
  • 2 C flour
  • 1 tsp salt
  • 1 tsp baking powder
  • 1/2 tsp baking soda

Mix shortening, sugar, adding egg and mix. Stir in bananas and sour dough. Sift dry ingredients and add to first mixture. Add nuts. Stir a little. Pour into greased loaf pan.

Bake at 350 for 50-60 minutes.

Sourdough biscuits or short cake

Did someone say shortcake??? Strawberry shortcake is one of my number one favorite summer desserts. Especially if you go the extra mile and make homemade whipped cream. Making your own whipped cream is so easy! It really makes your dessert extra special.

Ingredients:

  • 1 C sourdough
  • 1 C flour
  • 1/4 C oil
  • 2 tsp baking powder
  • 1/2 tsp baking soda
  • 1/2 tsp salt

Mix together, knead and cut.

Bake at 400 until lightly brown.

Yield 12-18 biscuits.

Sourdough Short Cake

Same as above. Add 2 TBSP sugar to the biscuit recipe and press into pan.

I hope you have found some inspiration here for new sourdough recipes! I hope you will leave a comment or tell me about it on Facebook.

4 Favorite Dessert Bar Recipes

Here are 4 of my very favorite dessert bars. I love how quick they go together, no fussing around scooping out cookies! Always a hit or parties and cookouts or for a day that just needs a bit of something sweet.

If I can make bars instead of cookies I almost always do. They are a time saver and are just as good, if not better than cookies!

These all are tried and true vintage recipes straight from our Grandma’s recipe collection to you! I hope you find your family’s new go to dessert bar recipe.

Lemon Bars

Sweet and tangy my personal favorite. I always make these for Easter. I really love these Lemon Bars and so does everyone that tries them! The shortbread crust with the tangy lemon filling is a winning combination.

Be sure to foil line your pan. The lemon wants to stick if you don’t.

https://youreverydayheirlooms.wordpress.com/2019/07/08/lemon-bars-best-ever/

Oatmeal Bars

Delicious chewy oatmeal bars. This recipe has lots of room for you to customize with what you like best or make due with what you have on hand. I like to be indulgent and eat these for breakfast! Maybe adding raisins would make them healthy!

This recipe makes a very large batch! I made a half batch and had plenty to share. These would be ideal for a bake sale or as part of dessert trays.

https://youreverydayheirlooms.wordpress.com/2019/05/13/oatmeal-bars-quick-and-easy/

Mystery Bars

The mystery must be, how can something so simple be so delicious? We love these bars. With no fancy ingredients these are easy to make for no special reason! Mystery Bars taste like a visit with Grandma! That old fashioned comfort we all love.

Coconut is one of my very favorite dessert ingredients so of course Mystery Bars are one of my personal favorites.

https://youreverydayheirlooms.wordpress.com/2019/05/27/mystery-bars/

Dream Bars

Another great vintage recipe! Cornflakes add a really good crunch and flavor. Make a batch of these for your next potluck! These remind me of 7 Layer Bars my Granny used to make. Not as much work but a similar rich flavor.

https://youreverydayheirlooms.wordpress.com/2019/05/01/1-requested-recipe-dream-bars

So there they are! What one are you going to make first?

Loretta Yoder’s Meatballs

Here is the first recipe from Grandma R’s Recipe Book. I’m going to do things a bit different in order to share more recipes with you all.

I’ll be choosing a variety of recipes I’m most excited about and sharing them before I have tried them. Once I try it (or one of you do), I’ll come back to add any tips as well as pictures. Hopefully I will also be able to find some information on Loretta Yoder.

Check out these ingredients! Have you ever heard of using sauerkraut in meatballs? I do think I will at least drain it and maybe rinse the sauerkraut. What would you do? Let me know in the comments or on Facebook. I’d love to hear from you.

Grandma R made notes on how to convert this to a Crock-Pot recipe. When I try it I will try it as written. Or possibly I will brown the meatballs first.

Loretta Yoder’s Meatballs

Ingredients:

  • 2 lbs. ground beef
  • 1 package dry onion soup mix
  • 1 C bread crumbs
  • 6 oz. chili sauce
  • 1 can cranberry sauce
  • 10 oz can sauerkraut
  • 1/2 C brown sugar

Mix ground beef, soup mix, and bread crumbs. Form meatballs and put into a 13×9 pan.

Mix chili sauce, cranberry sauce, sauerkraut, and brown sugar. Pour over meatballs. Bake uncovered for 35-60 minutes at 370.