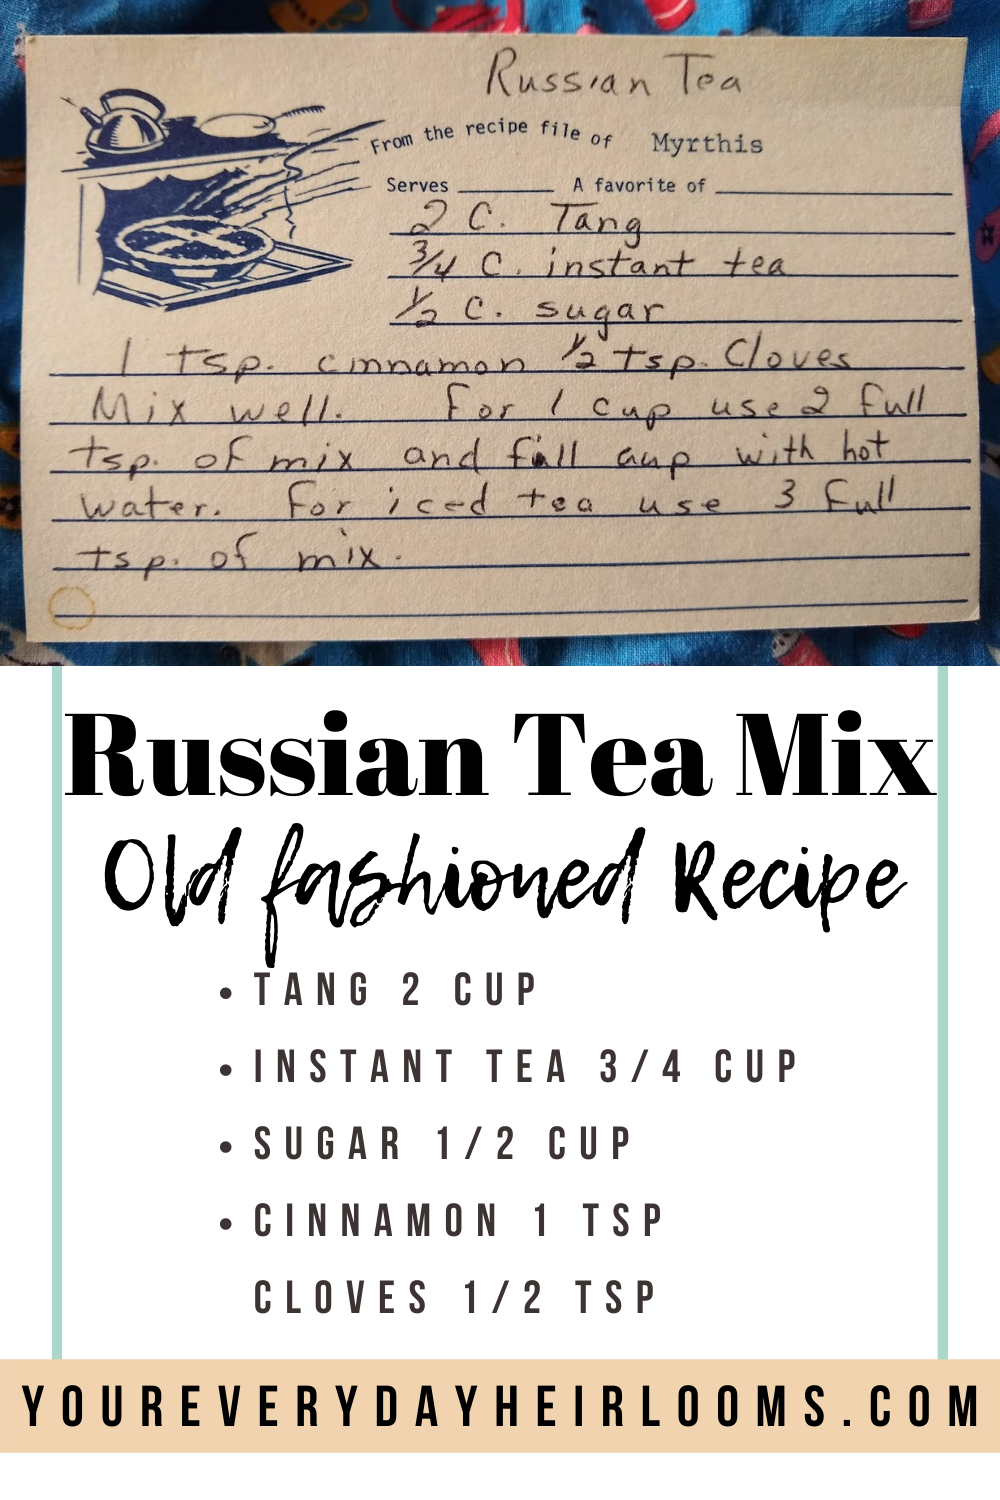
This surprising and not Russian recipe gained popularity in church cookbooks! This version was in Grandma R’s recipe box from an unknown woman named Myrthis. I will have to check with my Father in Law to see if he knows anything about her.
This sweet spiced tea is found in many (if not most) church or community cookbooks, especially if you live in the south. I’m a Midwest girl and have actually not yet tried this recipe!! If this is something you have made or if you try this recipe I’d love to hear from you! Tell me all about it in the comments or check out my Vintage Recipe Test & Share Facebook group. In the group I share recipes as I post them here, ones I find that I haven’t been tried, and others as I sort through my collection, I hope you will join us! It is the best way to get these vintage recipes tested and ready to share! It takes a community.
Southern Living has a wonderful article on the history of Russian Tea. I highly recommend you checking it out for a fun history lesson!
How to Make and serving suggestions
This is a super simple recipe! Just combine all ingredients and store in an airtight container. You could easily make this and then put in small jars to give as gifts. Even the small 4 oz. jars would hold several servings of the Russian Tea mix. Top it with a square of fabric and you are all set for a perfect old fashioned gift.
This easy tea mix can be served either cold over ice for a refreshing summer time treat or served hot for a cozy winter beverage.
To serve hot mix 2 full teaspoons of mix in 1 Cup of hot water.
For iced tea use 3 teaspoons of mix with 1 Cup of cold water and serve over ice.
This should make approximately 77 servings of hot Russian Tea. The nutrition information in the recipe card is for using 2 teaspoons in one cup of hot water.
Grandma’s chewy molasses cookie recipe is one of our family favorites, a must have during the holiday season.
This Drop Molasses Cookie recipe was in Grandma R’s recipe box. Most of the recipes she added herself seem to be typed, while ones given to her are in the handwriting of whoever shared them with her. I love how organized and varied her collection is! I’ve found some real treasures.
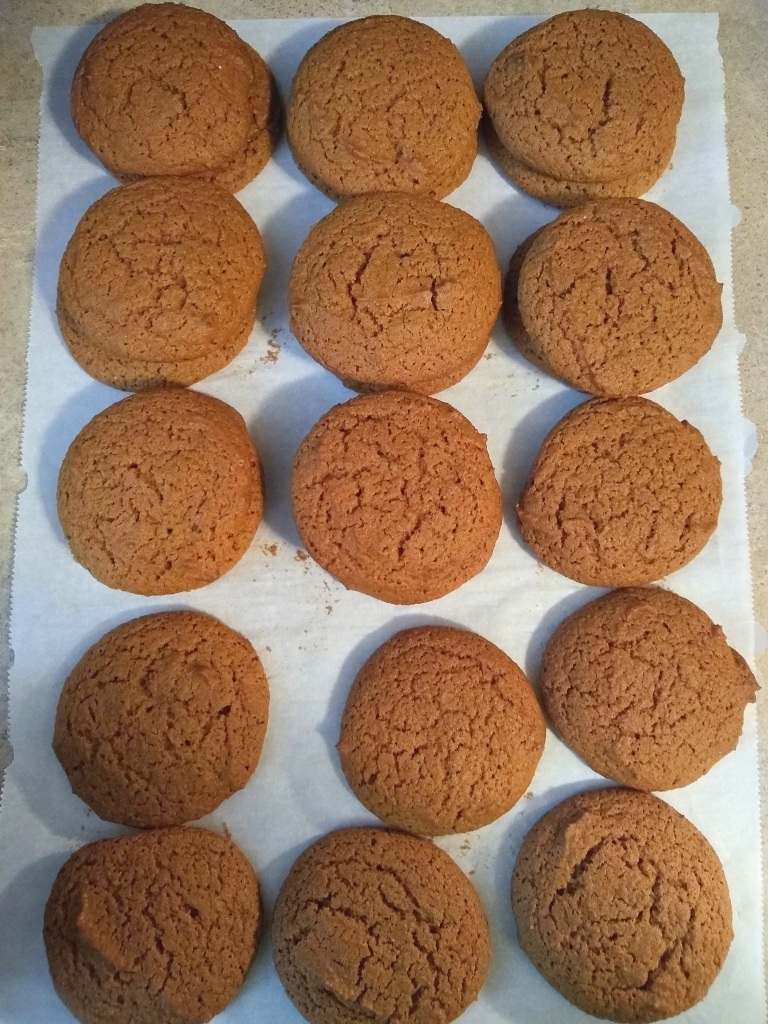
Look how nice and neat these look! I finally got a cookie scoop and it makes all the difference!
The members of my Facebook Group Vintage Recipe Test and Share were extremely helpful in testing this recipe with me! I hope you will join us in this fun Facebook community! I share recipes that need to be tested there first, tips, and others post their favorites as well.
Maryellen made a batch and helped me finalize how much extra spices we thought this needed. Once we got that figured out she said “We absolutely loved them. Saving the recipe as they are sure to become a family favorite”. She also came up with the idea to roll them in a cinnamon sugar mixture! Really adds a wonderful flavor and makes these molasses cookies even prettier!
Susan had the brilliant idea to dip them in white chocolate and then top with sprinkles. This would be fun to do with children or just as a way to add a different flavor to these classic cookies.
Drop molasses cookie ingredients
This recipe calls for pretty standard cookie ingredients.
Molasses: My grocery store had two choices Grandma’s original or Blackstrap. I used Grandma’s original which is a light molasses. I would recommend light but if you try dark or blackstrap please let me know how it turns out.
If you want to know more about the different types of molasses and it’s uses check out this helpful article by The Spruce Eats.
Sugar: I used white since a recipe usually says to use brown if that’s what is intended. Brown sugar would be a delicious substitution in these, it really adds such a depth of flavor that goes well with molasses. I will be trying that the next time I make these cookies!
Shortening: I used the 1 Cup of shortening the recipe required. You could likely substitute butter or possibly margarine. Shortening helps baked goods be light and fluffy and that was definitely true for these cookies. If you use butter or margarine expect your cookies to be flatter and less chewy.
I’ve linked this Shortening vs Butter in Cookies article before but it’s a really interesting read. The author baked multiple batches of chocolate chip cookies changing out the fat and refrigeration time.
The one thing that I was unsure of was 2 teaspoons baking soda in 1/2 Cup hot water. I reached out the the Vintage Recipe Test & Share Facebook group and they quickly reassured me it’s simply put the baking soda in hot water and mix before adding to the cookies.
Tips for making the best drop molasses cookies
Add extra spices. For a more flavorful cookie I suggest adding an additional 1 teaspoon of both cinnamon and ginger, 1/2 teaspoon of salt, and adding a 1/4 teaspoon of cloves and allspice. Feel free to change that up to suit your preferences.
Roll the cookies in a mixture of cinnamon and sugar. This makes them extra flavorful and looks really pretty.
Don’t tell Grandma but I just put all the ingredients in a big bowl then mixed with an electric mixer. The best way would be to first cream the sugar and shortening, then add the eggs. Separately mix together all dry ingredients. Mix all together adding the water and soda mixture last. Up to you! Be warned this is a big batch and if you do it like I did start out with your mixer on low!
How to store
These cookies lasted really well in a tightly sealed container. They stayed soft and chewy for around a week, my son gobbled them up before I could test them out any longer! Tightly sealed they should last up to 3 weeks.
Why I loe these cookies
Of course I love them because they came from Grandma R’s recipe box but, these really are a wonderful cookie. These drop molasses cookies have a perfect blend of spices that taste like the holidays! Soft and chewy they go well with a cup of coffee or a glass of milk.
Grandma's chewy molasses cookie recipe is one of our family favorites, a must have during the holiday season.
I will be adding the suggested increases in spices to the recipe here. If you would prefer to make the original version use the recipe card posted above.
Roll in a mixture of cinnamon and sugar before baking for extra flavor.
Credit: YourEverydayHeirlooms.com
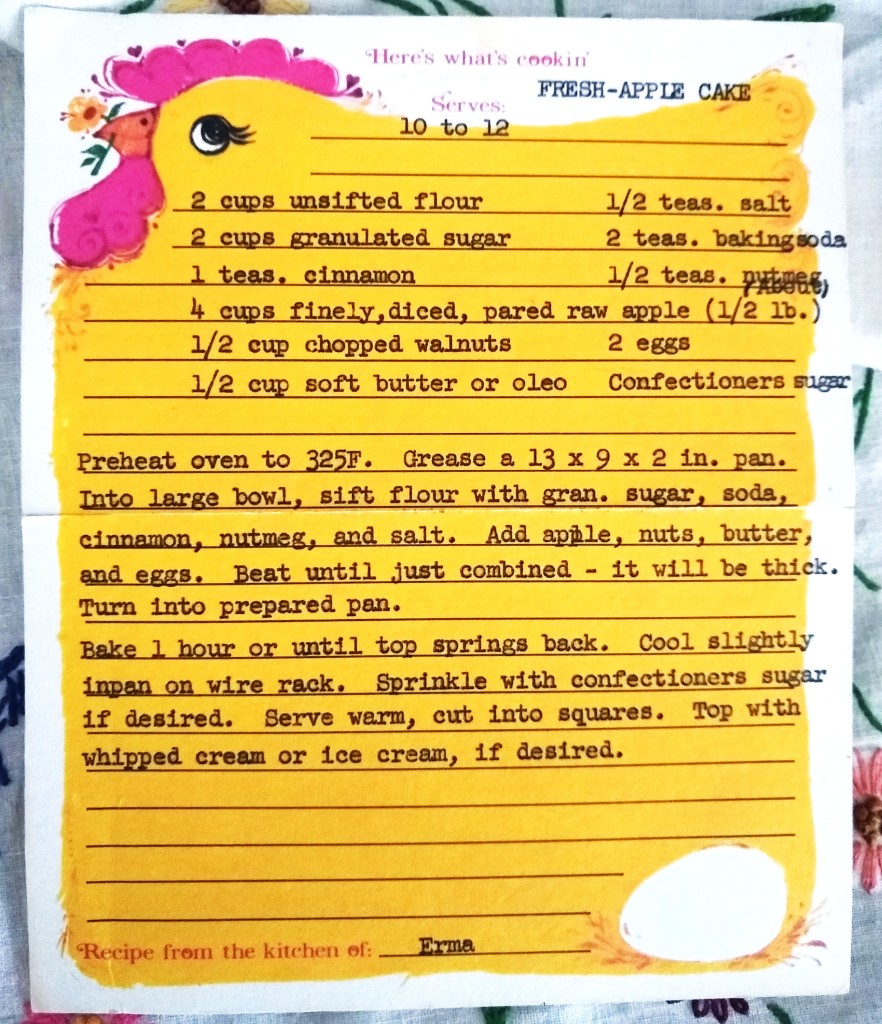
Ingredients
1 Cup molasses
1 Cup sugar
1 Cup shortening
2 eggs
4 Cups flour
1 teaspoon baking powder
3 teaspoons cinnamon
3 teaspoons ginger
1 teaspoon salt
1/4 teaspoon cloves
1/4 teaspoon allspice
2 teaspoons baking soda dissolved in 1/2 Cup of hot water
Directions
Pre-heat oven to 350
In a large bowl beat the eggs with shortening, add the molasses and sugar, beat until combined. Add dry ingredients mixing after every cup of flour. Last mix in the baking soda that has been dissolved in hot water.
Drop or use a small cookie scoop on to a parchment paper lined cookie sheet. If you would like roll in a cinnamon sugar mix before placing on the sheet.
Bake for 12-15 minutes, at 350.
Nutrition
Per Serving: 75 calories; 3.9 g fat; 10.2 g carbohydrates; .3 g protein; 3 mg cholesterol; 46 mg sodium.
Processing…
Success! You're on the list.
Whoops! There was an error and we couldn't process your subscription. Please reload the page and try again.
This is the only recipe tucked in the very front of Grandma R’s recipe box with no category.
I can almost smell this salt substitute even though I have never had it! So many good, classic spices in this vintage recipe.
Looks nice and simple but no measurements were listed so I’m going to go ahead and assume equal parts. What do you think?
If you would like to test this recipe please let me know how it turns out! I’d love to include your thoughts and tips here for others to learn from. Check out Vintage Recipe Test & Share on Facebook to join our small but growing group! We are working hard to test these vintage recipes so they are preserved online for years to come.
Mary Vogt was one of Grandma R’s friends. I’ll be asking my Father in law for more information and will update when I have it!
These cookie bars are a crowd pleaser and so easy to make. A not to sweet sugar cookie crust is topped with chocolate and butterscotch chips.
I found this recipe in the recipe box I bought at an estate sale. It had been in my must make pile for way too long! I needed a last minute treat for my son to take and I had everything on hand for these so finally I made them. I don’t know I waited so long. Really easy to put together and they were a huge hit.
The rough edges and stains were clear signs this was a much loved recipe at some point. I wish I had more information about the lady who’s collection this was in. Even just her name. Her memory is living on with me every time I make something from her recipe box. So at least there’s that.
The back of the card reads “sprinkle with chopped nuts. Cut into desired shapes”. As you can see I skipped the nuts. My pizza cutter was perfect for cutting these once they cooled.
Why I love these cookie bars
Super easy to make!
All of the ingredients are ones I usually have on hand. No special trip to the store needed.
Makes a large 9×13 pan, approximately 15 squares. Perfect for sharing. You can easily cut them smaller if desired.
It’s easy to make half the pan chocolate and the other butterscotch so everyone can have their favorite.
tips for making toffee cookie bars
Melt the chocolate and butterscotch chips in the microwave. Don’t try to sprinkle them on top and put it back in the oven. Trust me it didn’t work!
Spray a light coating of nonstick spray or use parchment paper. There is a good amount of butter and shortening but I like to be safe.
If you need to serve them quickly pop them in the refrigerator to help the chips set faster.
Use a pizza cutter to get nice smooth cuts.
Substitutions
Try other flavors of chips. The base is a delicious sugar cookie type flavor but really is quite neutral. I used butterscotch and milk chocolate because I had them on hand and they go well together. I’d suggest white chocolate, espresso, or cinnamon if you can find them.
If you had to you could use white sugar instead of brown sugar. It will take away some of the depth of flavor.
Why Butter and shortening
Butter adds delicious flavor while shortening helps these toffee cookie bars be taller and more tender. The shortening helps these cookie bars not fall flat. I have only made them with 1/2 butter and 1/2 shortening like the recipe calls for. If using all butter I would expect them to still taste great but to be flatter. For all shortening they will be nice and fluffy but missing some of that extra butter flavor, I would consider using some imitation butter flavoring if using only shortening.
Tastes of Lizzy T has a really great post where she made cookies using practically every combination of refrigeration and butter vs shortening! You really should give it a look. Her test found that 1/2 shortening and 1/2 butter with an hour of refrigeration made the best cookies, and that 1/2 and 1/2 no refrigeration made the prettiest. I’m sure the same reasoning applies to why these toffee squares are so good!
Storage
Cookie bars store extremely well. In a tightly sealed container at room temperature they should keep for up to 5 days.
other dessert bar recipes
Lemon Bars are one of the recipes I make over and over again. Truly one of our families very favorite recipes.
Coconut and brown sugar are the winning combination in Mystery Bars. I wish I knew what the mystery is with these!
Oatmeal Bars have all the oatmeal cookie flavor we love packed into an easy to make bar instead. I think these are an especially good breakfast cookie (that’s a thing right?) because they go so well with a cup of coffee!
This is my most requested recipe. Everyone goes crazy for Dream Bars! Cornflakes give a perfect crunch in this easy to make dessert bar recipe.
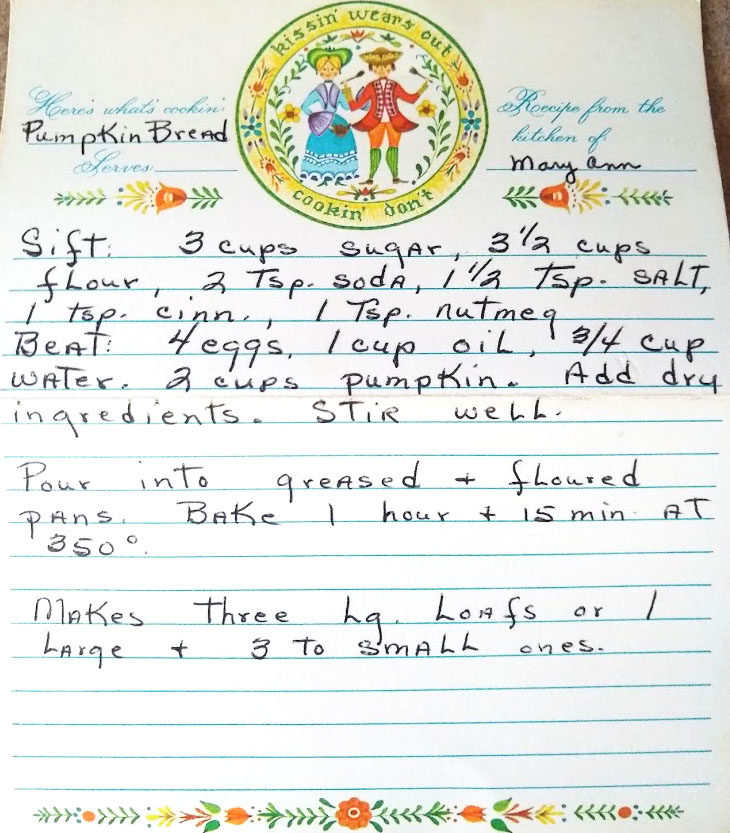
This is my new favorite quick bread for fall. Seriously full of pumpkin spice flavors, moist, and easy to make! Just one bowl. Grandma knew what she was talking about with this one! Look no more for your new recipe for pumpkin bread.
This is another of Grandma S’s recipes that was in Grandma R’s recipe box. I knew they were friends but it’s really sweet to see just how many of each others recipes they have. They both were excellent cooks!
This pumpkin bread recipe really is a delicious fall treat. Perfect to enjoy with a cup of coffee. Moist and bursting with fall flavors.
Other Quick Bread Recipes
If you have been following along you know that I especially love to make quick breads. They are just so easy to make and you can’t seem to mess them up! Be sure to check out the others ones I’ve made.
Apricot Bread is a beautiful golden loaf with a light citrus flavor. The dried apricots really give this a pretty look.
Cranberry Bread is another fall favorite! Add dried cranberries for an even nicer flavor.
What quick bread list would be complete without Banana Bread? This recipe has never failed me and I’ve made it dozens of times! When your bananas get too brown toss them in the freezer. Once you have two or three it’s time to thaw them and make a loaf!
Tips for how to make Pumpkin Spice Bread
It makes 3 large loafs or 1 large and 3 small. So plan to share, freeze, or halve the recipe. Or its super good just eat it all, I won’t judge!
Be sure to buy pumpkin puree not pumpkin pie filling. The pie filling is pre-sweetened and spiced.
2 Cups pumpkin puree is approximately one 15 ounce can.
For more fall spice flavor add 1/4 teaspoon of allspice or cloves. You could also double the cinnamon to 2 teaspoons.
My mini loaf pan is the size that makes 4. So I did one regular loaf pan and filled 3 in my mini.
This is an easy recipe that you make in just one bowl.
How to store pumpkin spice bread
Let cool completely then wrap tightly in aluminum foil or plastic wrap. This pumpkin spice bread should keep for up to 3 days at room temperature or up to 6 days when refrigerated.
This recipe freezes very well. Wrap tightly in aluminum foil, I usually double wrap it just to be safe, then place in a freezer bag. It is good in the freezer for up to 3 months.
When ready to use after freezing let it thaw at room temperature for one hour, unwrap and transfer to a baking sheet or loaf pan. Bake at 350 for 5-10 minutes until heated all the way through. Then let it cool before slicing. It will be as good as the day it was baked.
Need another pumpkin recipe? Check out this Pumpkin Cake, also from Grandma S. She called it pumpkin bars and left the flour off on accident. But I got it all figured out and it will not disappoint!
Baking times by pan size
Mini Loaf size baked in 40 minutes. The regular loaf took 1 hour. To be safe I suggest you check mini at 30 minutes and the large/regular loaf at 50. Once a knife or toothpick comes out clean the bread is finished.
A note about serving size and nutrition information
This recipe makes 3 large loafs or 1 large loaf and 3 mini loafs. I decided to do serving and nutrition based on 1 large loaf cut into 12 servings and each mini as 6 servings for a total of 30. There just isn’t a good way to add that in the recipe card so I wanted to clarify that here.
This cream cheese frosting recipe is so easy to make! You will never need to buy store bought again! Not too sweet, this recipe really lets the tangy cream cheese flavor shine. Perfect for Pumpkin Spice Cake, the super easy Chocolate Wacky Cake, or on a Traditional Spice Cake. This homemade cream cheese frosting recipe will be your new go to frosting for all sorts of baked goods.
I have been intimidated with making my own frosting for ever! My first try making homemade frosting was with White Fudge Frosting and while it wasn’t bad it wasn’t the best ever either. I’m still not sure where I messed up with that recipe!
This cream cheese frosting recipe won’t let you down! I loved it so much I didn’t even let a kid lick the spoon! I saved it for myself!
Somehow in all my vintage recipe boxes I didn’t have a single cream cheese frosting recipe! It was getting embarrassing sharing recipes here with you and then having to admit that I topped my scratch made cake with store bought frosting! Thankfully both Sandy and Debbie in the Vintage Recipe Test and Share group on Facebook saved the day by sharing this recipe with me to share with you! Sandy’s version called for vanilla but I forgot to add it! Whoops! Still tasted amazing! I’ll try it next time I make it.
Tips for making Cream Cheese frosting
Be sure that both your butter and cream cheese are room temperature.
Buy the full fat cream cheese that comes in an 8 oz brick not the spread that is in a tub.
Refrigerate all leftovers and what you have frosted.
The longer you mix this the lighter and fluffier it will be.
Yields approximately 2 Cups. Plenty for a 9×13 cake or a dozen cupcakes.
Make up to 2 days ahead and refrigerate. When ready to use let come to room temperature.
Change up the flavor by adding vanilla or up to 1/2 Cup of unsweetened cocoa powder.
How to make a thicker frosting
This makes a creamy frosting that isn’t especially firm. Not recommended for frosting things that need it’s frosting to hold its shape.
Refrigerate 15-20 minutes. This is the best way to thicken this recipe without changing the taste.
Try adding cornstarch. Start with 1 Tablespoon but use no more than 2.
Add more powdered sugar. Start with 2 Tablespoons and see how the texture and taste is before adding more.
Why I love this easy homemade cream cheese frosting recipe
So easy to make! You will never resort to buying store bought frosting again!
Only 3 ingredients that I usually have on hand. 4 if you add vanilla.
Cream cheese frosting goes perfect on so many desserts.
Super easy and amazingly delicious cream cheese frosting. Goes well on many baked goods.
Be sure to bring your cream cheese and butter to room temperature.
For serving size and nutrition information I used 24, the number of slices of cake the frosting covered.
Refrigerate all leftovers and what you frosted.
Optional: add 2 tsp of vanilla extract
Credit: YourEverydayHeirlooms.com
Ingredients
1 stick of butter (4 oz) room temperature
1 8 oz brick of cream cheese room temperature
1 Cup of powdered sugar
Directions
Place all ingredients into a large bowl.
Mix with handheld mixer or stand mixer for 3 minutes on low. Scrape sides and bottom with spatula. Mix for 3 minutes on high.
Nutrition
Per Serving: 86 calories; 7.1 g fat; 5.2 g carbohydrates; .8 g protein; 21 mg cholesterol; 55 mg sodium.
If you are interested in helping me test more of my vintage recipe collection so that I can preserve and share them here please join my Vintage Recipe Test and Share Facebook group. If we work together we can save more of these classic recipes for generations to come!
Processing…
Success! You're on the list.
Whoops! There was an error and we couldn't process your subscription. Please reload the page and try again.
I decided that September means fall and that it is time to get baking some of those delicious fall recipes I had been saving! This pumpkin spice cake is so easy to make and once you add cream cheese frosting it’s over the top yummy. All the tastes of fall in one pan, you make it in just one bowl too.
I’m not saying Grandma S was a liar but this recipe clearly makes a pumpkin spice cake not bars like it says! Last year I tried this recipe but, as you can see there was no flour listed originally. I figured it was not needed! Nope, it made a really gross gooey mess that I still ate spoonfuls of to try and convince myself it wasn’t a total failure. After consulting with similar recipes in my collection and online I determined that this definitely does need flour and that was what was wrong with the recipe. Possibly 2 cups is too much and that’s why its a cake and not bars. I’m not complaining because it is an amazing pumpkin spice cake that I’ll be making at least once a season.
I know it’s just a mix up but could we make frosten happen? Much more exciting than just frost!
The recipe says to frost but didn’t say with what type of frosting. I talked to so people in the Vintage Recipe Test & Swap group on Facebook and decided to go with a cream cheese frosting. It was a great choice and goes perfectly! I can’t imagine making it with any other frosting. This handmade cream cheese frosting is possibly my favorite frosting of all time. And it is so easy to make! Be sure to check the re
Tips for making pumpkin spice cake
Be sure that you buy pumpkin puree not pumpkin pie filling. The filling already has sugar and spices.
Wait until the cake is completely cool before you frost.
Store in the refrigerator.
It’s always nice to find recipes that don’t require you to dirty up lots of dishes! This one is mixed all in one bowl. I think it’s just as easy to make this pumpkin cake from scratch as it would be using a mix. Seriously the hardest part is waiting for it to cool so you can frost it then try it!
I cut the cake into 24 smaller sized squares and thought it actually might have tasted better after being refrigerated overnight. Of course I love cake no matter what.
You also might like this fall favorite: Cranberry Spice Bread. For a cozy fall meal check out Meatball Oven Stew. It’s the #1 recipe I look forward to making once the weather is cool enough.
Processing…
Success! You're on the list.
Whoops! There was an error and we couldn't process your subscription. Please reload the page and try again.
Please join me in the Facebook Group Vintage Recipe Test and Share. It’s a small but growing community working together to test vintage recipes so I can preserve them by sharing here. This is our first recipe tested as a community and I hope it’s the start of many more!
This recipe card is probably one of my favorites. The design is adorable and bright. Folding in half like that really makes it easier to use! Oh how I wish I could find cute cards like this for myself! Do you use recipe cards still or find everything online? What size do you prefer? Locally I can only ever find the modern, larger 4×6 size so it’s what I use. Once I make one of the vintage recipes I copy it to save in my collection and return the card to the box it came in.
I wish I knew who Erma is. This recipe was in the box I purchased at an estate sale in Michigan. I always think of the mystery lady who’s collection I purchased. She kept a very organized box (like Grandma R) and I love to look through the different categories for inspiration.
Photo from River V.
A huge thank you to Jennifer C and River V for testing this recipe and sharing your pictures and thoughts. I appreciate your help and support in making it so vintage recipes like this Fresh Apple Cake are preserved for years to come!
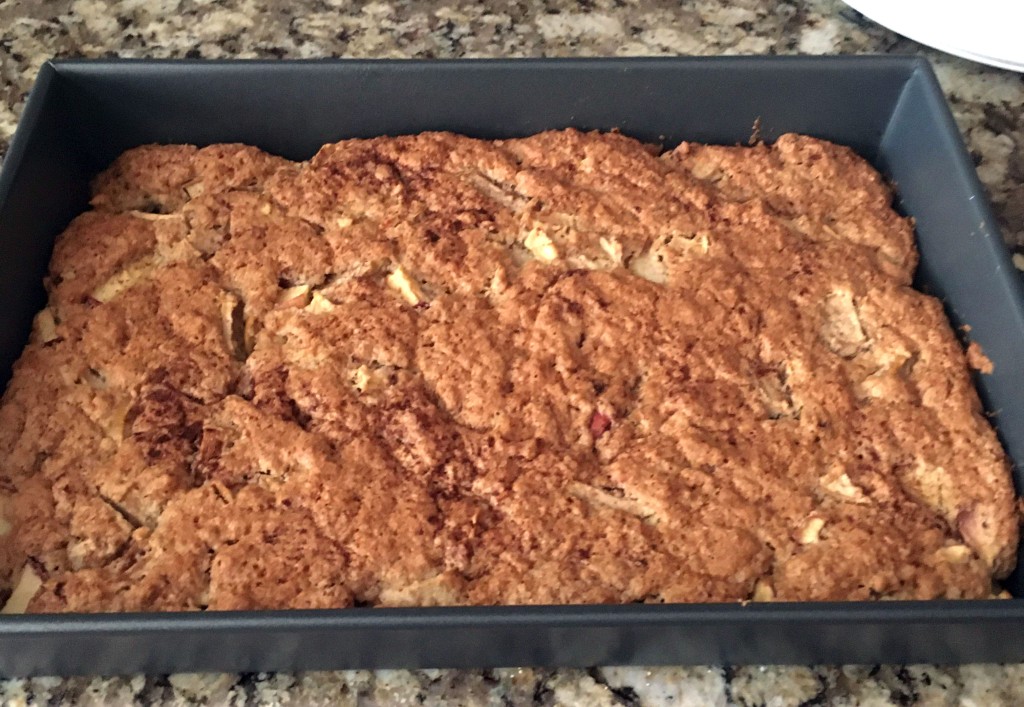
Jennifer C’s Fresh Apple Cake before being baked.
As you can see Erma was not kidding when she said the dough will be thick!
Reviews for Old Fashioned Fresh apple Cake from testers
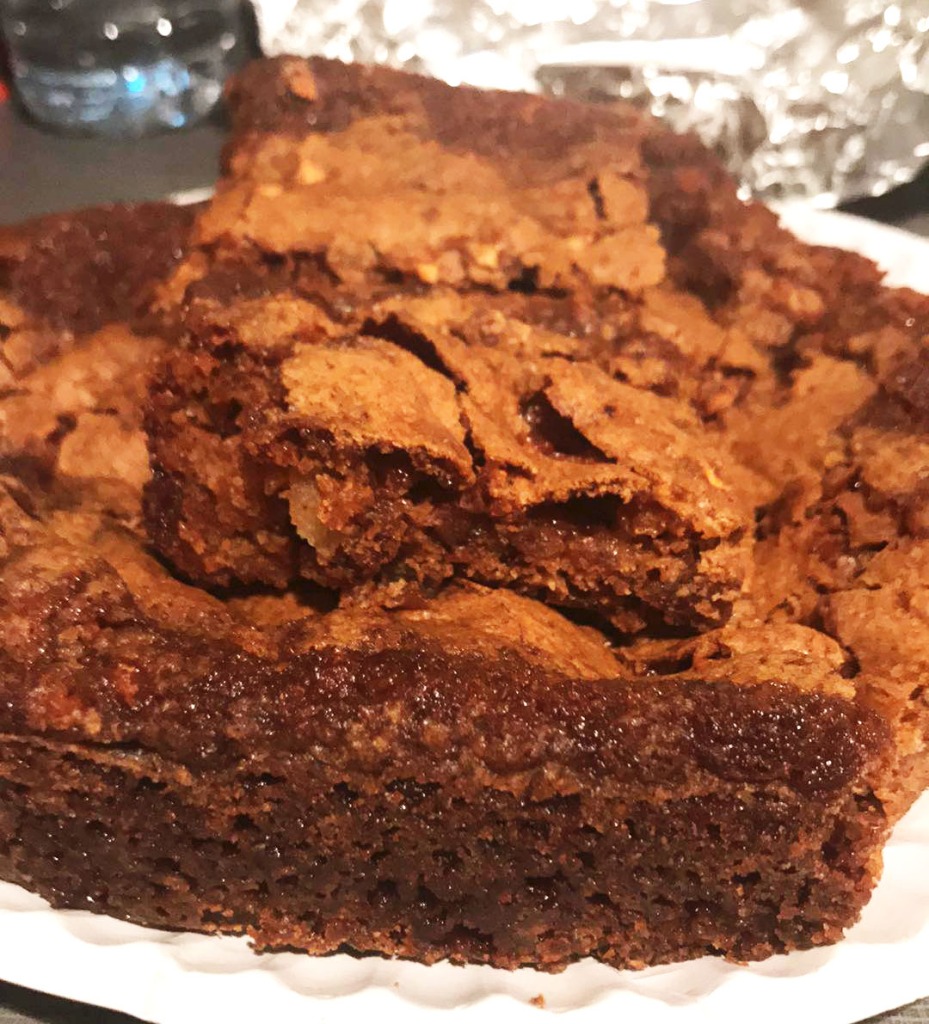
From Jennifer C: My entire house smells ahhhhh-mazing and I can’t wait to just blow my “diet” and eat it. It took half the amount of time to cook. Was done in about 32 minutes. It has a weird texture and consistency. Very dense, more like a bread or brownie, texture is chewy and top is crunchy. Flavor is amazing though.
River V: It was ready after 45 minutes instead of an hour. This was my first time making it but I will definitely be making it for fall and winter holidays in the future cause of its simplicity.
Super Cat: I made this for a picnic last weekend and it was a hit! While making it, I was very surprised at how thick the dough was, but it came out very moist and was most similar to a coffee cake
Tips for making Fresh Apple Cake
Chop your apples very small. This extra effort will improve the taste and texture of your cake.
Be sure that your butter is soft or at room temperature.
Check to see if it is done at 30 minutes. A knife or toothpick should come out clean when it is done.
Jennifer C’s baked Apple Cake. I think room temperature butter and even smaller apples would help the texture to be more like a coffee cake than a brownie. Delicious any way!
This vintage spice cake recipe is full of comforting fall flavors but, not overwhelming. Just right for fall and the winter holidays. It would go perfect with a glass of mulled cider. You won’t believe how easy it is to make this spice cake from scratch! Just like Auntie Gay did! So much better than from a mix.
For my father in laws birthday I decided to make him his present. I just love giving gifts that I’ve made whether it is something I’ve knit or crocheted, a quilt, or food! Who doesn’t love a homemade gift? I knew for sure I’d make him Hamburger Pie, his favorite thing his mother used to make but, of course I couldn’t just stop there! I started looking in his mom’s, Grandma R’s, recipe box for inspiration.
I had intended to make him a German Chocolate Cake but didn’t plan ahead so, I not only was missing the right size cake pans but also the right chocolate. Time to rummage through the recipe boxes, one of my most favorite things to do! As soon as I saw this traditional spice cake recipe I knew it was what I was going to make. Clearly it was well loved! Look how worn this recipe card is!
Several of Grandma R’s recipes are attributed to “Mrs. Gay”, I wasn’t sure exactly who she was! Not to spoil my surprise after I gave my father in law his food gifts I asked him. Growing up he called Mrs. Gay Auntie Gay. Not because she was an aunt but a close family friend. Auntie Gay lived on the same street as his grandparents and parents so she was one of the adults he saw often but because he was a child didn’t know well. He remembers that she always made popcorn balls for Halloween. Yum!
My inlaws declared this cake tastes exactly what they remembered! So many of these recipes aren’t of things I’ve ever tasted before so I worry they aren’t just right. It’s so reassuring when I hear they are like they should be. It’s such a joy to have and try all these family recipes.
How to make spice cake
This is a really easy spice cake recipe! No fancy appliances or ingredients needed!Add all ingredients in order mixing as you go, pour into 9×13, and bake! That’s it! The recipe wasn’t super clear on exactly how to mix this up so that’s what I did and it turned out great. From now on you will always make your spice cake from scratch! I’ll insert the whole recipe as a printable card below.
Spice Cake Tips
It surprised me to see this recipe call for 1/2 to 2/3 Cup eggs instead of saying how many eggs to use. I have never seen that before! So just to be sure I cracked them into a measuring cup and needed 3 large eggs. 2 was just under and 3 was slightly over. Use your best judgement! Next time I’ll likely skip measuring and call 3 close enough.
Spice cake additions
Try adding a Tablespoon of molasses for a deeper flavor.
Substitute brown sugar for half or more of the sugar.
To me the combination of cinnamon, nutmeg, and cloves just screams fall! Starting about the middle of August I’m ready for the season change and all the goodness that comes along with it. Fine cooking really sums up how I feel about this classic spice trio.
Separately or together, cinnamon, nutmeg, and cloves work magic in baking and desserts, heightening flavors and aromas. What would apple pie be without cinnamon? Rice pudding would taste flat without its pinch of nutmeg, and pumpkin pie just couldn’t thrill without clove’s special zing. Used alone, each of these spices announces its presence in a dish. When used together, the personality of each is subdued, but in turn, the combination is greater than the sum of its parts.
This vintage spice cake recipe is full of comforting fall flavors but, not overwhelming. Just right for fall and the winter holidays.
Credit: YourEverydayHeirlooms.com
1/2 to 2/3 Cup eggs is equal to approximately 3 large eggs.
Ingredients
1 1/3 Cup sugar
1/2 Cup shortening
1/2 to 2/3 Cup eggs for me that was 3 large eggs
2 Cups sifted flour
3 1/2 teaspoons baking powder
1 teaspoon salt
1 teaspoon cinnamon
1/2 teaspoon nutmeg
1/4 teaspoon cloves
1 Cup milk
1 teaspoon vanilla
Directions
Add ingredients to a large mixing bowl in order, mixing between each one.
Pour into a greased 9×13 baking pan. Bake at 350 for 35 to 40 minutes.
Let cool completely and frost with cream cheese frosting or your favorite.
Nutrition
Per Serving: 295 calories; 18.9 g fat; 25.3 g carbohydrates; 7.5 g protein; 182 mg cholesterol; 231 mg sodium.
If you enjoy this Spice Cake Recipe you will want to be sure to check out this Chocolate Wacky Cake recipe. Another vintage family recipe!
I’d like to invite you to join me in my Vintage Recipe Test and Share group on Facebook. We are working together to make and preserve more vintage recipes here! I can’t make them all myself and would love your help!
Processing…
Success! You're on the list.
Whoops! There was an error and we couldn't process your subscription. Please reload the page and try again.
Be sure to find me on Pinterest! I save all my recipes there and share others that I can’t wait to try!
You also can connect with me on Facebook, Twitter, and Instagram! I’d love to hear about your families recipes!